Pans, Heat, and Bonding 

by Sarah Diregger

While cooking, one can notice that metal becomes hot very quickly and wood or plastic is safer to touch if you’re not in the mood for a 2nd-degree burn. I’m sure everybody knows not to touch the pan while it sits on the stove. But why? What’s the difference between metal and plastic? Why does metal heat up so easily? 

Firstly, to prove my theory that metal heats up faster than plastic I experimented: 

You need a plastic rod, a metal rod, an infrared camera, and warm hands. You hold each rod in your hands for 1-2 minutes. Then you point the infrared camera at the two rods, and you can see the results immediately.  

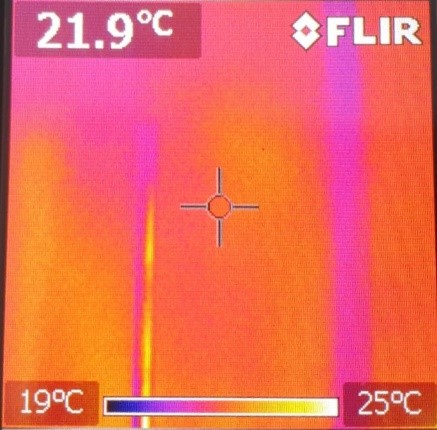
Here, you can see an image of the two rods next to each other before the experiment: It’s very faint but I think you can make out two different sticks. The left one is metal, the right one plastic. 

This is what the plastic rod looks like after one hand held it: 

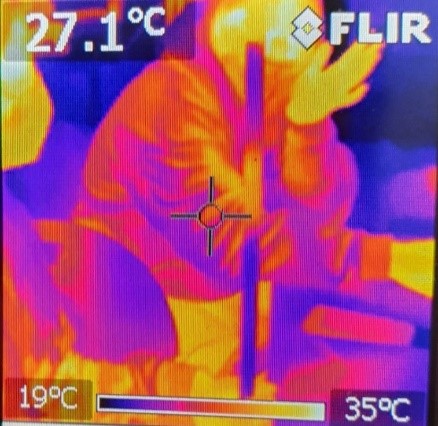
This is what the plastic rod looks like after 3 hands held it: 

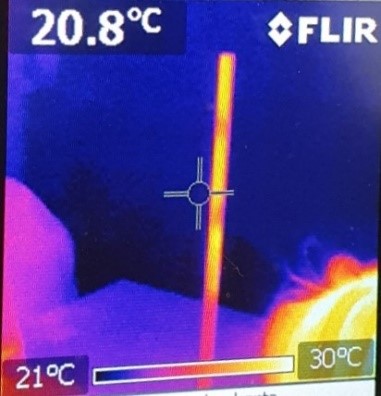
This is what the metal rod looks like after a you hold it in your hand: 

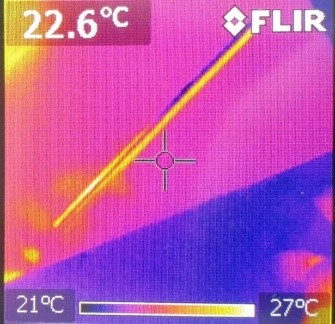
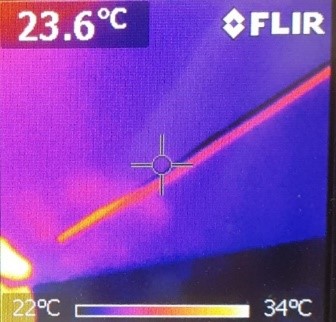
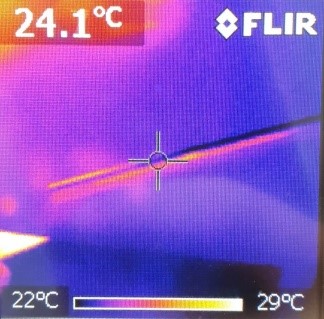
On the scale at the bottom of the images, you can see which color symbolizes which temperature. Consequently, we can see that before the experiment, both were at about the same temperature. After the experiment, the plastic rod was only heated at the area you held it. However, the temperature of the warm hands spread farther and the area of warmth was greater than the size of your hands. 

The explanation for this phenomenon lies on the atomic level. It’s important to know that atoms form 3 different types of bonds: 

Covalent bond: Bond, in which atoms share electrons 

Ionic bond: One atom gives its valence (outermost) electron(s) to the other atom. Therefore, one atom acquires a positive charge and the second acquires a negative charge. Positive and negative attract each other, leading to the atoms forming a bond. 

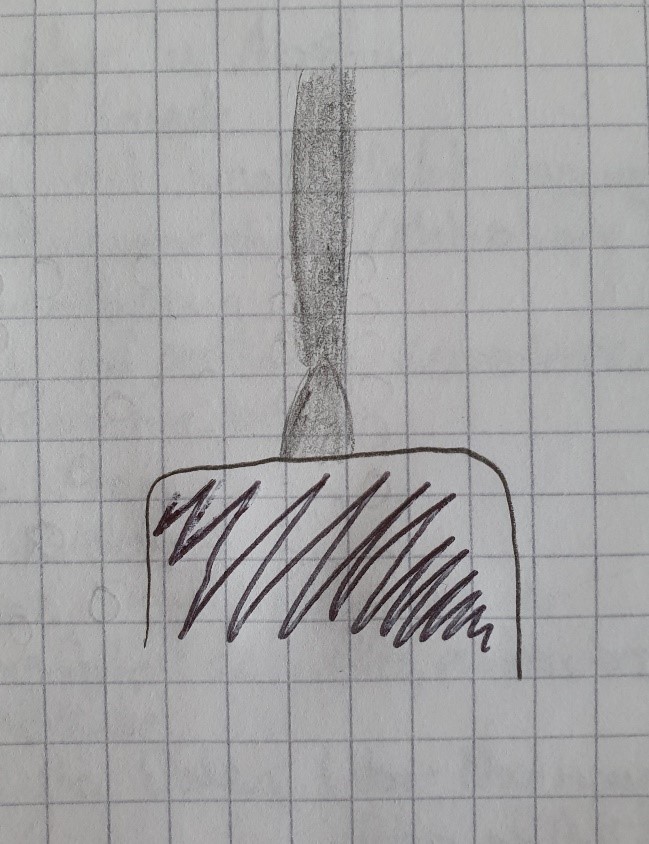
Metallic bond: The nuclei (plural of nucleus) of the atoms arrange themselves in a fixed structure, while the negatively charged electrons move freely in between the positively charged nuclei. 

Here is an illustration to help you visualize what this looks like: 

Before I explain further, it’s crucial to know what heat is. Heat is basically the vibration of atoms and molecules within a substance. The more they vibrate, the hotter the substance is. 

We will be focusing on the last type of bond, the metallic bond. Since the electrons don’t have a fixed position within the atomic structure, they can move around more than the electrons in a covalent or ionic bond. If we look at the physical properties of heat, it’s obvious why metals, who have metallic bonds, conduct heat better. The electrons can vibrate easier and it’s easier for them to pass this vibration on to the next electrons. Plastic has a covalent bond. Therefore, the atoms within the polymer (the scientific name for plastic) are tied together tighter and vibrations can’t be transmitted as easily. 

In conclusion, metals transfer heat the best because of the type of atomic bonds they have. The metallic bond allows electrons to move between the nuclei. Therefore, the movement of heated electrons can be conveyed easier than in fixed bonds. Which important lesson do we learn in our day-to-day lives? Never use metal if you want to handle something hot because it doesn’t shield the heat. 

Sources:

https://www.edinformatics.com/math_science/why_metals_conduct.htm#:~:text=Metal%20is%20a%20good%20conduction,of%20their%20energy%20to%20them.

https://www.britannica.com/science/crystal/Conductivity-of-metals

https://www.lernhelfer.de/schuelerlexikon/chemie/artikel/waermeleitung#

https://chem.libretexts.org/Bookshelves/Physical_and_Theoretical_Chemistry_Textbook_Maps/Supplemental_Modules_(Physical_and_Theoretical_Chemistry)/Chemical_Bonding/Fundamentals_of_Chemical_Bonding/Metallic_Bonding

https://www.chemie.de/lexikon/Metallische_Bindung.html#:~:text=Als%20Metallische%20Bindung%20oder%20Metallbindung,Metallen%20und%20in%20Legierungen%20vorliegt.&text=Sie%20wird%20durch%20Anziehungskr%C3%A4fte%20zwischen%20Metall%2DIonen%20und%20freien%20Elektronen%20verursacht.

https://www.lernhelfer.de/schuelerlexikon/chemie/artikel/metallbindung

[last access: 24.01.2022]

The magic tube

written by Michael Himmelbauer

I am quite sure you have already seen it or at least heard about it: the magic tube. An optical experiment which is usually shown at the presentation evening of our school. An experiment with the help of which you can impress students from primary school as well as grown-ups (believe me – I am talking out of my personal experience). Although the name sounds complex, it can easily be done at home.

Here is what you need:

  • a transparent plastic tube with a length of approximately thirty centimeters
  • two polarization-filters (honestly, these could be the components the most difficult to get)
  • a screwdriver
  • a ping-pong ball (or something similar)

At first, you have to put the two polarization filters into the tube rotated by an angle of 90 degrees as shown in the picture:

As you may expect, a round black disc can be made out in the middle of the tube. In order to check whether it is real or not, you could use the screwdriver or the ping-pong ball to try if you are able to penetrate the disc (especially young children can be impressed by that). After some tries you might find out that the magic black circle does not really exist or is at least not resistant against your power (caused by their knowledge and perspective, younger students are often confused at that point).

But why can a black disc be seen even if there isn’t anything inside the tube except two plastic films?

First of all, we have to get in touch with the physical discipline of optics. (Now you might ask yourself: What the hell is that?) It is the science of the spreading of light and the effects of different materials on its behavior. Normally, light is a wave spreading from its origin (for example the sun, but also the lightbulb inside the physics room) into all directions. As soon as it gets to the polarization filter, only the horizontal or vertical component of the wave is let through and the other parts are kind of absorbed by the film (at least, it is easy to imagine this physical process like that). To simplify the process, we imagine that light does not exist out of vectors into every direction, but only into the following two directions: horizontal and vertical. As you put the two filters rotated by an angle of 90 degrees into the tube (in case you read the instructions carefully), both one of them only let 50 percent of the entered light pass through. And in case you are able to square 0.5 (I suppose you can or know how to use a calculator), you’ll find out that only 25 percent (so almost nothing) of the original amount of light will pass both films. And that is why a magic black disc can be made out inside the tube. In case you are talented in imagining geometry (or attend geometry class), you might assume that when you look through both filters when being amazed by the effect inside the transparent glass, the waves getting to your eyes (ask a biologist if you have any questions concerning that topic) have to pass both polarization filters and that is why there seems to be an almost black object. The color of the disc can be explained by the fact that if 75 percent of the light is absorbed, the rest (25 percent) appears to be quite dark.

Just in case you are really fascinated by the effects of two toned plastic films, you can try watching reflections of the window on a smooth surface (for instance the floor in the physics room) by looking through one of the polarization filters. While rotating the filter slowly, you might find out that you can see the reflections when holding it in one direction, but in the other direction, they disappear. It’s magic, isn’t it?

To sum up, it can be stated that with the help of two polarization filters, many spectators can be impressed and quite some things can be found out about the characteristics of the magic waves that light up our everyday life.

source:
Anon.: Polarisation von Licht. Einführung. https://www.leifiphysik.de/optik/polarisation/grundwissen/polarisation-von-licht-einfuehrung [last access: 22.01.2022]

fotocredit: (c) by Michael Himmelbauer

Die große Implosion

von Jana, Pia und Eva

Wolltest du schon immer eine Dose explodieren lassen, aber du durftest nicht? Dann lass sie doch mit unserer Hilfe implodieren. Achtung! Bitte nur unter Aufsicht eines Erwachsenen durchführen! 😉 

Dazu brauchst du:   

  • Eine Dose
  • Eine Wanne mit Wasser 
  • Einen Bunsenbrenner 
  • Eine Zange zum Halten 
  • Evtl. ein Haargummi zum fixieren 

Als ersten Schritt musst du ca. 3 El Wasser in die Dose füllen, die Dose mit der Zange festhalten und mit einem Haargummi fixieren. Als nächstes musst du die Dose über den Bunsenbrenner halten, bis das Wasser darin kocht und dampft. Sobald das der Fall ist, musst du schnell reagieren! Du musst die Dose schnell umdrehen und sofort in die Wanne mit Wasser tauchen und achte darauf, dass die Öffnung der Dose zuerst im Wasser landet. Die Dose sollte dann sofort sehr stark zusammengedrückt werden.   

Was ist gerade passiert?  

Der Effekt, den du dabei gesehen hast, nennt sich Vakuumeffekt. Durch das Erhitzen des Wassers entsteht Wasserdampf, welcher die Luft in der Dose verdrängt. Wenn man nun die Dose abkühlt, kondensiert das Wasser, wodurch ein Vakuum entsteht. Durch den umgebenden Luftdruck wird die Dose zusammengedrückt. 

Hier findest du noch Videos von unseren implodierenden Dosen !

The Hunt for the Shadow of the Flame

Sarah D.

It’s Christmas time!! Which means candles. Like…a lot…literally everywhere. Consequently, many candle-related questions come up, such as “Which scent smells the best?”, “Which color should I buy?”, “Can I gift mom with even more candles this year?”. Those are the normal type of questions an average human asks. As scientists, we ask wonderful questions like “How hot is a flame?”, “Can I separate the different chemical components of wax?”, “Do flames have shadows?”. That is the question I want to answer. So, I decided to go on the Hunt for the Shadow of the Flame. Is it real? If it exists, how does it work? 

To demonstrate and help visualize the answer, I conducted an experiment. If you want to reconstruct the experiment you will need a candle, a white sheet of paper, a bright flashlight, and a match to light the candle (unless you want to try it with flint and steel, which I don’t recommend). Firstly, you must darken the room to see results. Then you set the lit candle about 5 to 10 centimeters in front of the white sheet of paper. Take a flashlight that is brighter than the flame and shine it on flame. Now, you will see that the flame itself has a faint shadow, and the air above the candle also has a shadow. It looks like this: 

Ein Bild, das Wand, drinnen, Kerze, Licht enthält.

Automatisch generierte Beschreibung

Since the flashlight from the phone wasn’t bright enough, the shadows aren’t very visible. Therefore, I drew a picture of what the shadow is supposed to look like: 

Why do these shadows appear? 

I’ll start by explaining the shadow of the air above the fire: It’s important to know that the candle heats the air above it. The surrounding air remains cold, though. Molecules within hot air move faster than molecules in cold air. Because of the fast-moving molecules, the density in warm air is less than the density in cold air. That means when a light ray moves from the colder air into the hotter air, it goes through a change in the refractive index. (Sarah, what in the gods of physics, is a refractive index?) When a ray of light passes from one medium into another, it’s called a change in the refractive index. It’s important to know, that the light doesn’t get refracted inside the new medium but at the surface of the new medium. In our case, hot air is considered a different medium than cold air, since it has a different density. That means some of the light, which passes through the air above the flame, gets refracted (bounces off and gets redirected) and a shadow appears.  

Next, I’ll explain the shadow of the flame: Burning the wick results in hot ionized gas, burnt carbon fibers, burnt oxygen molecules, and burnt fuel. The resulting substance is also called soot. The soot particles refract the rays of light from the flashlight, forming a faint shadow. Due to the flame being hot, the change of RI also influences the path of the light. 

To sum everything up: Fire produces a faint shadow, and you can also see the hot air above the flame forming a slight shadow. This is because of the change in RI, which causes the refraction of some of the light. The flame itself consists of burning particles. These particles also redirect the path of the flames. 

Fliegende Löffel

Von Jana G. und Pia Z.

Wolltest du schon immer einmal das teure Tafelsilber deiner Eltern, für ein Experiment verwenden? Dann nimm dir die Gold- oder Silberlöffel und probiere dieses Experiment aus.                                                                                                

Dafür brauchst du folgende Utensilien:  

  • 2 Löffel (am besten aus Gold/ Silber 😉) 
  • 1 Hand (am besten die, die nur als Deko dient) 
  • Schutzhelm/ Schutzbrille 

Bei möglichen Verletzungen:  

  • Kühlpad 
  • Überraschungsei als Aufmunterung  
  • Nun legst du die zwei Löffel in den folgenden Stellungen:  
Ein Bild, das drinnen enthält.

Automatisch generierte Beschreibung
Ein Bild, das drinnen, Tisch enthält.

Automatisch generierte Beschreibung

Jetzt musst du nacheinander bei jeder Lagerung auf den unteren Löffel mit der Hand draufschlagen. Wie in folgendem Video ersichtlich ist.

http://www.haberbauer.at/scienceblog/wp-content/uploads/2022/01/20211206_141524-1.mp4

Dabei  beobachtest du bei welcher Lagerung sich der obere Löffel am öftesten dreht. Nachdem wir die Versuche mehrmals ausprobiert haben, sind wir zu dem Schluss gekommen, dass sich bei uns der obere Löffel, wenn man sie so wie bei dem dritten Bild auflegt, öfter dreht als bei den Anderen. Als wir uns jedoch das Lösungsvideo zu dem Versuch angesehen haben, mussten wir mit schreck feststellen, dass unsere Löffel leider ihren eigenen Kopf haben ( im Video war das richtige Ergebnis Bild 1).  

Weil wir diesen schweren Schicksalsschlag nicht so hinnehmen wollten, haben wir die Versuche daraufhin wiederholt und alles versucht, um unser Ergebnis geradezubiegen😉 .  Aus Verzweiflung haben wir dann angefangen, die Löffel zu verbiegen, da uns aufgefallen ist, dass diese im Video nicht so stark gebogen waren, wie bei uns. Dadurch sind  wir auf das Ergebnis gekommen, dass sich bei dem 1. Bild der obere Löffel höher fliegt und sich schneller dreht, je gerader der Stiel des Löffels ist und je steiler die Schaufel.  

Die erste Methode ist am effektivsten, da der obere Löffel zwei Berührungsstellen mit dem anderen Löffel hat und somit mehr Schwung bekommt und höher fliegt. 

Unser Fazit ist, dass dieses Experiment sehr stark von der Form des Löffels abhängt.