Heute zeigen wir dir, wie du ganz ohne Strom und mit Sachen, die du ziemlich sicher zu Hause hast, ein Telefon basteln kannst.
Dafür brauchst du:
Plastikbecher (4)
Faden (3,5 Meter lang)
Nadel
kleines Holzstück
Als Erstes musst du bei jedem Becher ein kleines Loch durchstechen, wo du dann den Faden durchführst. Danach verknotest du den Faden im Becher mit dem kleinen Holzstückchen, sodass der Faden nicht mehr herausrutschen kann. Als letzten Schritt musst du 2 Becher mit dem gleichen Faden verbinden und wenn du mehr als 2 Becher verwenden willst, musst du für jeden zusätzlichen Becher einen weiteren Faden in der Mitte anknoten.
Physikalische Erklärung für Dummies:
Die Stimme besteht aus Wellen, die beim Hineinsprechen in den Becher zentriert und an den Faden weitergegeben werden. Diese Vibrationen schwingen über den Faden dann zu den anderen Bechern, wo sie wieder freigesetzt werden.
By using a common shoebox, enjoyable music with a high sound quality can be played. What sounds to be unimaginable, can be realized with some components you may have at home, but can also be found in the physics room:
an amplifier (the older the better)
two cables
a magnet (the stronger the better)
a coil (or a long piece of wire and a cylinder (for example from toilet paper))
the star of the experiment: a shoebox (without the cover)
a device with a plug to play music
and of course: enjoyable music (for instance on your mobile phone)
First of all, you have to glue the coil (or the wire wrapped around the cylinder) onto the bottom of the shoebox. Furthermore, the cables have to be plugged into the amplifier (take care that you use the correct ports) and have to be connected to both of the ends of the coil (no matter whether it is bought or a self-made one) as shown in the pictures:
Moreover, you have to select a relaxing song to play (due to the wide range provided on the internet, this could be the most difficult part of the experiment). In order to broadcast the music, you have to connect your mobile phone, computer or MP3-player to the amplifier (either via another cable or wireless). As soon as you have started the song, place the magnet in the middle of the coil as shown in the picture:
In case you read the instructions carefully and the cable connection works, you may be speechless at that point as you can hear your favorite song without using a classical speaker (or headphones).
But why’s that? Why can music be played without using speakers?
Admittedly, the shoebox works as a speaker as the mantle of the cuboid replaces the membrane.
In order to understand that phenomenon, we need to take a look at an electro-magnetic force named by the physicist Hendrik Antoon Lorentz. It occurs as soon as a current flows through a conductor. Its direction has an angle of 90 degrees to the direction of the flow and the magnetic field.
And as the amplifier dispenses alternating current (AC), the direction of the flow inside the coil changes constantly and that is why the direction of the Lorentz force changes, too. Subsequently, as the magnet remains at the same place, the coil swings back and forth with the frequency of the flow (that the amplifier dispenses). As a result of that (the coil is sticked onto the bottom of the shoebox), the membrane swings with the same frequency. Moreover, the swinging membrane spreads waves into the air that get to our ears where they are converted into an electric signal that is forwarded to the brain (ask a biologist if you’ve got any questions concerning the processes inside the human body).
To convey the theory more easily, I made a drawing that outlines the effects of the currency to the coil and depicts the formation of the acoustic waves:
In case you are curious, you could also use the speaker for playing spoken records (for instance a speech from a well-known politician or the latest news program). While listening to the wisely chosen words from a famous person, you may be amazed by the high quality and the clear sound.
Another usage of the self-built speaker could be its opposite, a microphone. When recording waves, the Lorentz force is considered to move the electrons inside the wire and that is the reason why an electric voltage is induced (to try that, you could conduct an experiment on your own that is similar to the described one).
To sum up, it can be mentioned that with the help of a shoebox and some other components, but without a speaker, music can be played and quite some things can be found out about the characteristics of the acoustic waves that enable us to understand each other properly.
source: Putz, Bruno; Jahn, Brigitte: Faszination Physik 7 bis 8. Lehrplan 2018. Linz: Veritas 2019, p. 13
A usual laser pointer emits one ray, but nine can be seen on the wall after the ray passes a special optical instrument. What sounds to be impossible, can be realized with the help of some components that you may not have at home, but fortunately can be found in the physics room:
a laser pointer (for example a green one)
a bar grid
two tripods
for measuring: a measuring tape
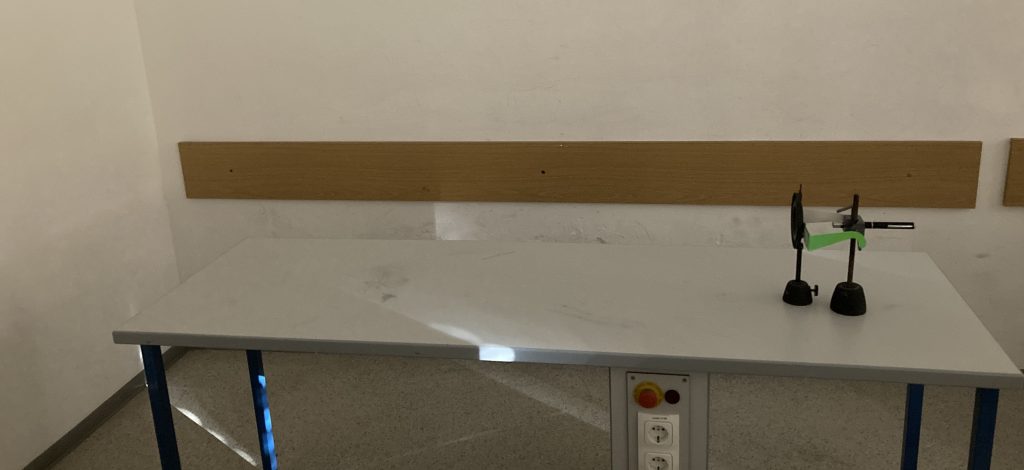
First of all, you have to set up the components as shown in the picture, preferably in front of a white wall in a rather dark room.
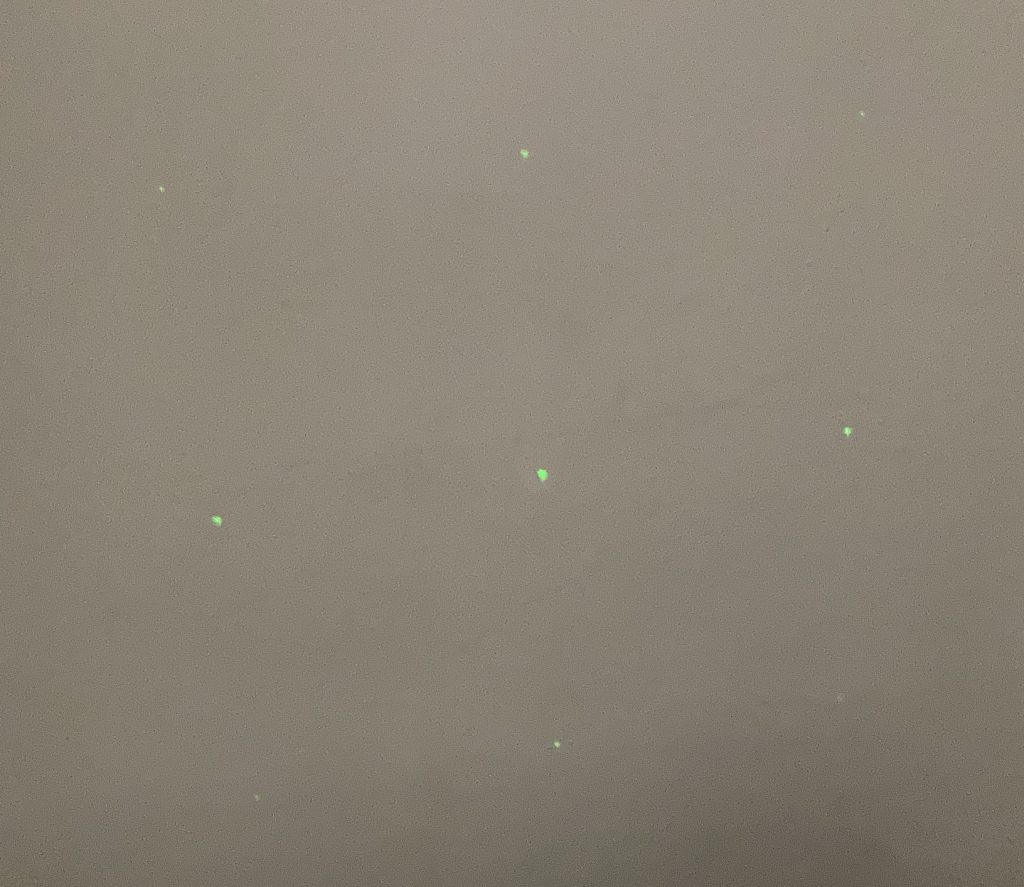
When you switch on the laser pointer, you may be surprised by the fact that you can see nine rays on the wall, although only one ray is emitted by the laser pointer. At that point, you might want to ensure that it works properly, but please do NOT look directly into the light of the laser pointer for safety reasons (at least if you don’t want to damage your eyes forever).
Now you may ask yourself: Why’s that? Why can nine times as many rays be made out even if only one is emitted?
Therefore, we need to take a look at the structure of the bar grid. It consists of several lines into horizontal and vertical direction printed onto a disc of glass. The label „200 lines per millimeter“ means that there is a space of 0.000005 m between each of the lines.
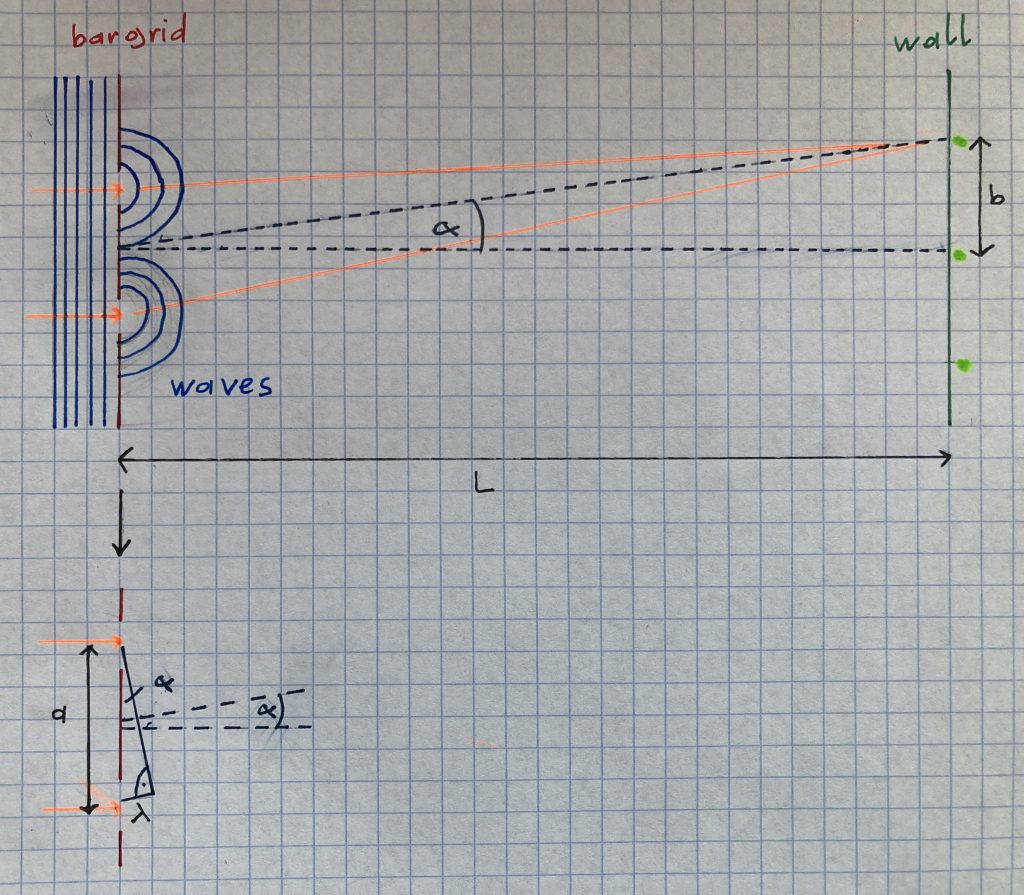
For simplifying the process, we need to assume that the bar grid doesn’t feature several, but only two gaps (with the same width as above). When an electromagnetic wave passes these gaps, it turns from a straight to a circular wave. After that, the amplitudes of the waves interfere with each other, and those interferences are spread until they get to the wall. There, they are reflected and the light (again in the form of waves, but with a much lower density) gets to our eyes.
For illustration, I made a drawing to convey the theory:
The next question that comes to your mind might be: Can this theory also have benefits when using it in a practical way?
As a scientist, I say: Yes, it can. For instance, we can take usage of it when calculating the wavelength of a specific color (and that’s the reason why we conducted this experiment).
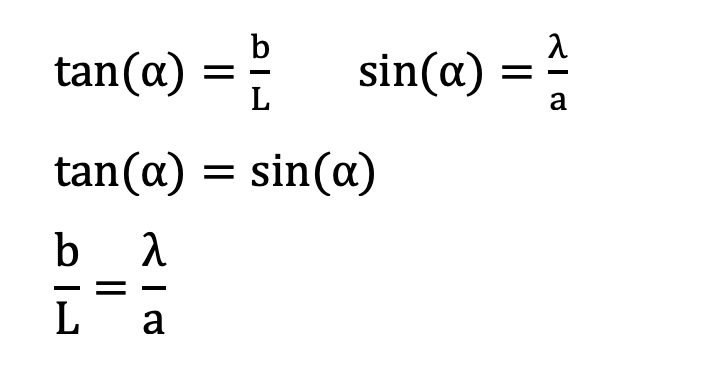
For simplification, we have to estimate that the sine of a small angle is has almost the same value as the tangent of the same angle (supported by the fact that for angles like that, the cosine is almost 1 and the tangent is calculated by the quotient of sine and cosine).
According to the drawing above, we can make up the following equations:
And as we are able to measure the distance from the tripod to the wall (2.08 m), the distance of the lines on the bar grid (0.000005 m) and the space between two points on the wall (0.225 m), we are able to do the following calculations easily:
That means that the light of the green laser pointer we used in the experiment has a wavelength of approximately 541 nanometers.
Another practical application of the effects of interference is used in clubs for the disco lights, featured with a small engine that slowly rotates the light emitting diode (LED). That is why some impressing patterns can be seen on the walls and on the ceiling.
To sum up, it can be mentioned that with the help of a laser pointer, a bar grid and two tripods, the wavelength of a specific color can be calculated and quite some things can be found out about the spreading of the electromagnetic waves that light up our everyday life.
source: Putz, Bruno; Jahn, Brigitte: Faszination Physik 7 bis 8. Lehrplan 2018. Linz: Veritas-Verlag 2019, p. 68-69