Midnight Moon Phases

By Sarah Diregger

Imagine you’re lying on your back, looking up at the sparkling stars scattered across the seemingly endless sky. The full moon drenches the nightly landscape into shades of grey. You’re enjoying the moment but a scientific thought snakes its way into your consciousness and asks, “Why do we never see a full moon during the daytime?” To help answer this question, I conducted an experiment. You’ll need:

  • A flashlight
  • 2 balls (preferably in two different sizes)
  • An even surface

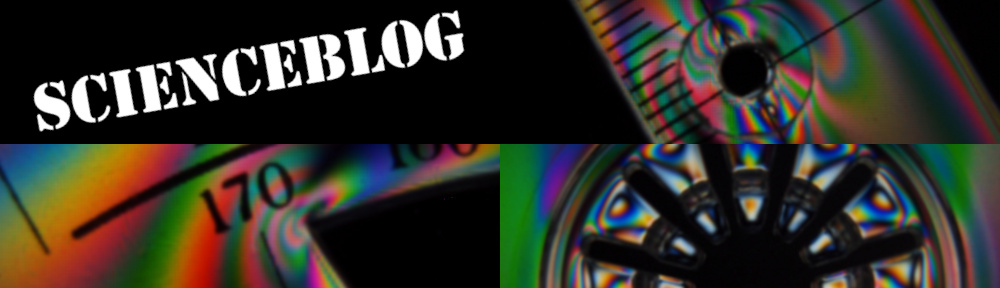
Now, you must set the two balls on the surface at a distance of approximately 10 – 20 cm. Now hold the flashlight, which represents the sun, about a meter from the two balls. I suggest using different-sized balls. The smaller one is the Moon and the larger one Earth.

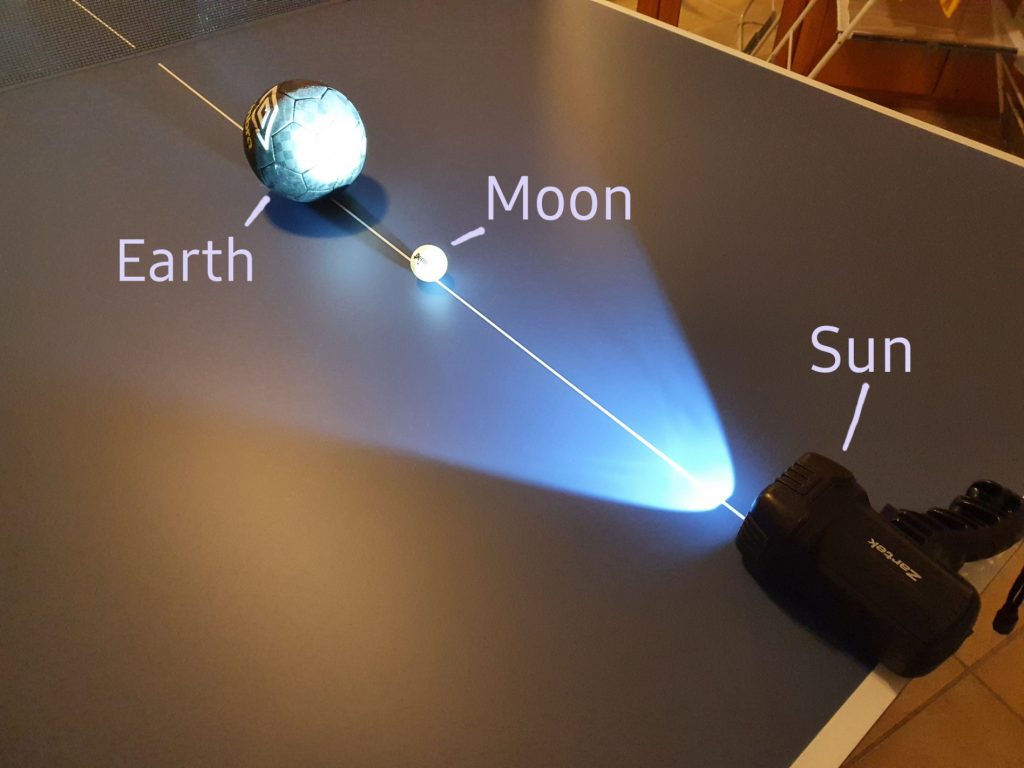
We all know that the Earth rotates around the Sun, and the Moon orbits the Earth. It’s also important to know that the Earth rotates around itself. One rotation of the Earth around itself takes 24 hours, and one rotation of the Moon around Earth takes 27,3 days.

Moving our “Moon” around the “Earth” in the experiment, we can see that depending on the position of the Moon, it’s seen from a different time of day. When the Moon is between Earth and Sun, it’s called a new moon. That means, from the point of view of Earth, you can’t see it at all.

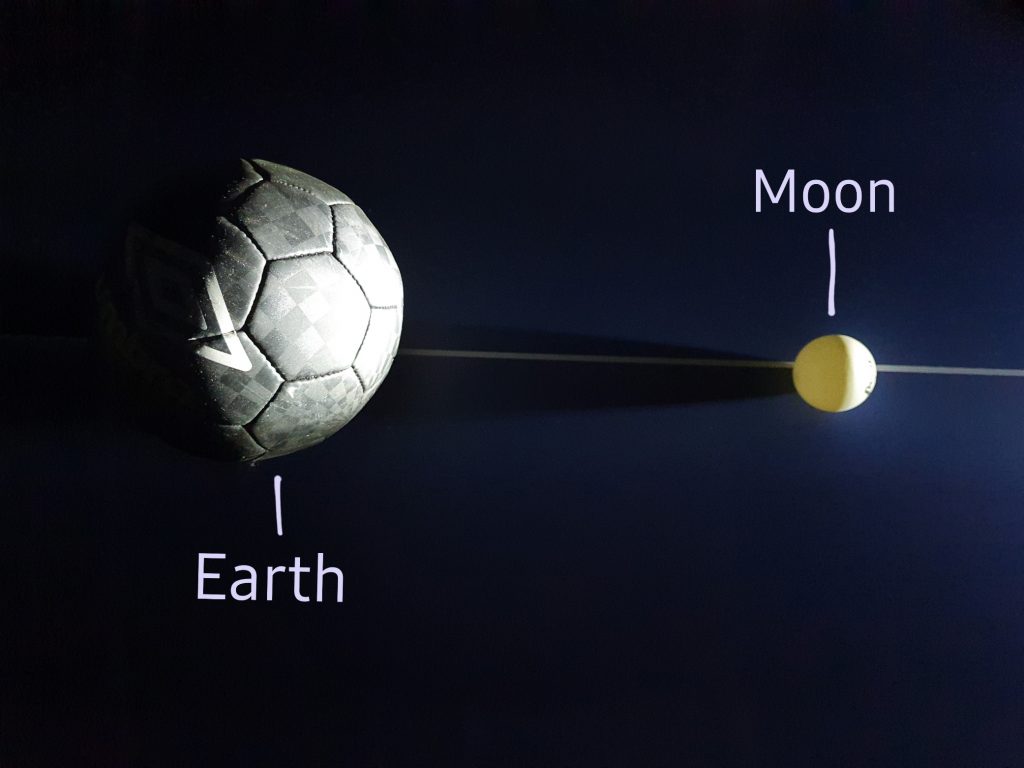
To imitate the rotation of the Moon, move it about 45° counterclockwise. You will see that from the vantage point of the Earth, a little light appears on the right side of the Moon. This waxing crescent, as we call it, can be seen at its highest position in the afternoon.

When you continue this process and move the Moon 45° counterclockwise each time, the following results can be observed:

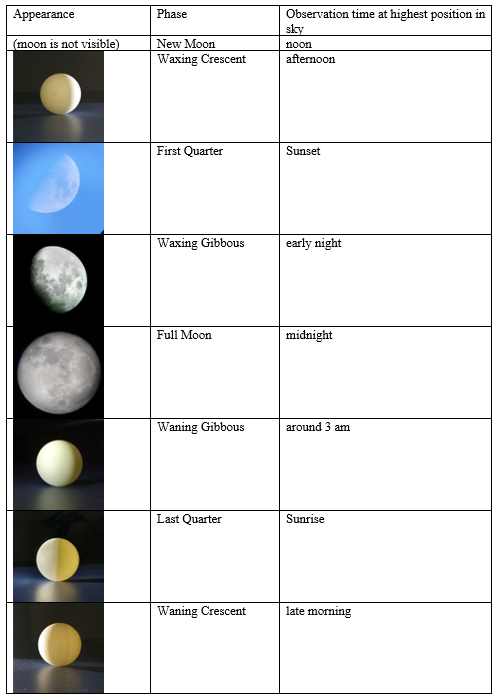
Some of the pictures above depict the real Moon and the others show our “Moon” model in the experiment.

Fun Fact:
From Earth, we always see the same side of the Moon. This is called “Tidal Locking”. It occurs when the rotation around the own axis and the rotation around another body take the same time.

Due to the position of the Moon and the Sun, we can only see a certain Moon phase in the center of the sky at a specific time of day. It’s very important to note the position of the Sun in all of this because it indicates which part of the Moon is illuminated and when we can observe this amount of illumination. That’s why we never see a full moon during the day.

Sources:
Byrd, Deborah: Moon Phases. Top 4 keys to understanding moon phases. https://earthsky.org/moon-phases/understandingmoonphases/#:~:text=As%20seen%20from%20the%20north,Not%20to%20scale. (last access: 21.03.2022)
Anon.: Lunar Phases and Eclipses. Earth’s Moon. https://solarsystem.nasa.gov/moons/earths-moon/lunar-phases-and-eclipses/#:~:text=These%20eight%20phases%20are%2C%20in,third%20quarter%20and%20waning%20crescent. (last access: 21.03.2022)
Anon.: Moon Phases. Moon in Motion. https://moon.nasa.gov/moon-in-motion/moon-phases/
Gunn, Alastair: Space. What is tidal locking?. https://www.sciencefocus.com/space/what-is-tidal-locking/ (last access: 21.03.2022)

fotocredit: © by Sarah Diregger

one laser pointer, nine rays

written by Michael Himmelbauer

A usual laser pointer emits one ray, but nine can be seen on the wall after the ray passes a special optical instrument. What sounds to be impossible, can be realized with the help of some components that you may not have at home, but fortunately can be found in the physics room:

  • a laser pointer (for example a green one)
  • a bar grid
  • two tripods
  • for measuring: a measuring tape

First of all, you have to set up the components as shown in the picture, preferably in front of a white wall in a rather dark room.

When you switch on the laser pointer, you may be surprised by the fact that you can see nine rays on the wall, although only one ray is emitted by the laser pointer. At that point, you might want to ensure that it works properly, but please do NOT look directly into the light of the laser pointer for safety reasons (at least if you don’t want to damage your eyes forever).

Now you may ask yourself: Why’s that? Why can nine times as many rays be made out even if only one is emitted?

Therefore, we need to take a look at the structure of the bar grid. It consists of several lines into horizontal and vertical direction printed onto a disc of glass. The label „200 lines per millimeter“ means that there is a space of 0.000005 m between each of the lines.

For simplifying the process, we need to assume that the bar grid doesn’t feature several, but only two gaps (with the same width as above). When an electromagnetic wave passes these gaps, it turns from a straight to a circular wave. After that, the amplitudes of the waves interfere with each other, and those interferences are spread until they get to the wall. There, they are reflected and the light (again in the form of waves, but with a much lower density) gets to our eyes.

For illustration, I made a drawing to convey the theory:

The next question that comes to your mind might be: Can this theory also have benefits when using it in a practical way?

As a scientist, I say: Yes, it can. For instance, we can take usage of it when calculating the wavelength of a specific color (and that’s the reason why we conducted this experiment).

For simplification, we have to estimate that the sine of a small angle is has almost the same value as the tangent of the same angle (supported by the fact that for angles like that, the cosine is almost 1 and the tangent is calculated by the quotient of sine and cosine).

According to the drawing above, we can make up the following equations:

And as we are able to measure the distance from the tripod to the wall (2.08 m), the distance of the lines on the bar grid (0.000005 m) and the space between two points on the wall (0.225 m), we are able to do the following calculations easily:

That means that the light of the green laser pointer we used in the experiment has a wavelength of approximately 541 nanometers.

Another practical application of the effects of interference is used in clubs for the disco lights, featured with a small engine that slowly rotates the light emitting diode (LED). That is why some impressing patterns can be seen on the walls and on the ceiling.

To sum up, it can be mentioned that with the help of a laser pointer, a bar grid and two tripods, the wavelength of a specific color can be calculated and quite some things can be found out about the spreading of the electromagnetic waves that light up our everyday life.

source:
Putz, Bruno; Jahn, Brigitte: Faszination Physik 7 bis 8. Lehrplan 2018. Linz: Veritas-Verlag 2019, p. 68-69

fotocredit: (c) by Michael Himmelbauer

The magic tube

written by Michael Himmelbauer

I am quite sure you have already seen it or at least heard about it: the magic tube. An optical experiment which is usually shown at the presentation evening of our school. An experiment with the help of which you can impress students from primary school as well as grown-ups (believe me – I am talking out of my personal experience). Although the name sounds complex, it can easily be done at home.

Here is what you need:

  • a transparent plastic tube with a length of approximately thirty centimeters
  • two polarization-filters (honestly, these could be the components the most difficult to get)
  • a screwdriver
  • a ping-pong ball (or something similar)

At first, you have to put the two polarization filters into the tube rotated by an angle of 90 degrees as shown in the picture:

As you may expect, a round black disc can be made out in the middle of the tube. In order to check whether it is real or not, you could use the screwdriver or the ping-pong ball to try if you are able to penetrate the disc (especially young children can be impressed by that). After some tries you might find out that the magic black circle does not really exist or is at least not resistant against your power (caused by their knowledge and perspective, younger students are often confused at that point).

But why can a black disc be seen even if there isn’t anything inside the tube except two plastic films?

First of all, we have to get in touch with the physical discipline of optics. (Now you might ask yourself: What the hell is that?) It is the science of the spreading of light and the effects of different materials on its behavior. Normally, light is a wave spreading from its origin (for example the sun, but also the lightbulb inside the physics room) into all directions. As soon as it gets to the polarization filter, only the horizontal or vertical component of the wave is let through and the other parts are kind of absorbed by the film (at least, it is easy to imagine this physical process like that). To simplify the process, we imagine that light does not exist out of vectors into every direction, but only into the following two directions: horizontal and vertical. As you put the two filters rotated by an angle of 90 degrees into the tube (in case you read the instructions carefully), both one of them only let 50 percent of the entered light pass through. And in case you are able to square 0.5 (I suppose you can or know how to use a calculator), you’ll find out that only 25 percent (so almost nothing) of the original amount of light will pass both films. And that is why a magic black disc can be made out inside the tube. In case you are talented in imagining geometry (or attend geometry class), you might assume that when you look through both filters when being amazed by the effect inside the transparent glass, the waves getting to your eyes (ask a biologist if you have any questions concerning that topic) have to pass both polarization filters and that is why there seems to be an almost black object. The color of the disc can be explained by the fact that if 75 percent of the light is absorbed, the rest (25 percent) appears to be quite dark.

Just in case you are really fascinated by the effects of two toned plastic films, you can try watching reflections of the window on a smooth surface (for instance the floor in the physics room) by looking through one of the polarization filters. While rotating the filter slowly, you might find out that you can see the reflections when holding it in one direction, but in the other direction, they disappear. It’s magic, isn’t it?

To sum up, it can be stated that with the help of two polarization filters, many spectators can be impressed and quite some things can be found out about the characteristics of the magic waves that light up our everyday life.

source:
Anon.: Polarisation von Licht. Einführung. https://www.leifiphysik.de/optik/polarisation/grundwissen/polarisation-von-licht-einfuehrung [last access: 22.01.2022]

fotocredit: (c) by Michael Himmelbauer

The Hunt for the Shadow of the Flame

Sarah D.

It’s Christmas time!! Which means candles. Like…a lot…literally everywhere. Consequently, many candle-related questions come up, such as “Which scent smells the best?”, “Which color should I buy?”, “Can I gift mom with even more candles this year?”. Those are the normal type of questions an average human asks. As scientists, we ask wonderful questions like “How hot is a flame?”, “Can I separate the different chemical components of wax?”, “Do flames have shadows?”. That is the question I want to answer. So, I decided to go on the Hunt for the Shadow of the Flame. Is it real? If it exists, how does it work? 

To demonstrate and help visualize the answer, I conducted an experiment. If you want to reconstruct the experiment you will need a candle, a white sheet of paper, a bright flashlight, and a match to light the candle (unless you want to try it with flint and steel, which I don’t recommend). Firstly, you must darken the room to see results. Then you set the lit candle about 5 to 10 centimeters in front of the white sheet of paper. Take a flashlight that is brighter than the flame and shine it on flame. Now, you will see that the flame itself has a faint shadow, and the air above the candle also has a shadow. It looks like this: 

Ein Bild, das Wand, drinnen, Kerze, Licht enthält.

Automatisch generierte Beschreibung

Since the flashlight from the phone wasn’t bright enough, the shadows aren’t very visible. Therefore, I drew a picture of what the shadow is supposed to look like: 

Why do these shadows appear? 

I’ll start by explaining the shadow of the air above the fire: It’s important to know that the candle heats the air above it. The surrounding air remains cold, though. Molecules within hot air move faster than molecules in cold air. Because of the fast-moving molecules, the density in warm air is less than the density in cold air. That means when a light ray moves from the colder air into the hotter air, it goes through a change in the refractive index. (Sarah, what in the gods of physics, is a refractive index?) When a ray of light passes from one medium into another, it’s called a change in the refractive index. It’s important to know, that the light doesn’t get refracted inside the new medium but at the surface of the new medium. In our case, hot air is considered a different medium than cold air, since it has a different density. That means some of the light, which passes through the air above the flame, gets refracted (bounces off and gets redirected) and a shadow appears.  

Next, I’ll explain the shadow of the flame: Burning the wick results in hot ionized gas, burnt carbon fibers, burnt oxygen molecules, and burnt fuel. The resulting substance is also called soot. The soot particles refract the rays of light from the flashlight, forming a faint shadow. Due to the flame being hot, the change of RI also influences the path of the light. 

To sum everything up: Fire produces a faint shadow, and you can also see the hot air above the flame forming a slight shadow. This is because of the change in RI, which causes the refraction of some of the light. The flame itself consists of burning particles. These particles also redirect the path of the flames.