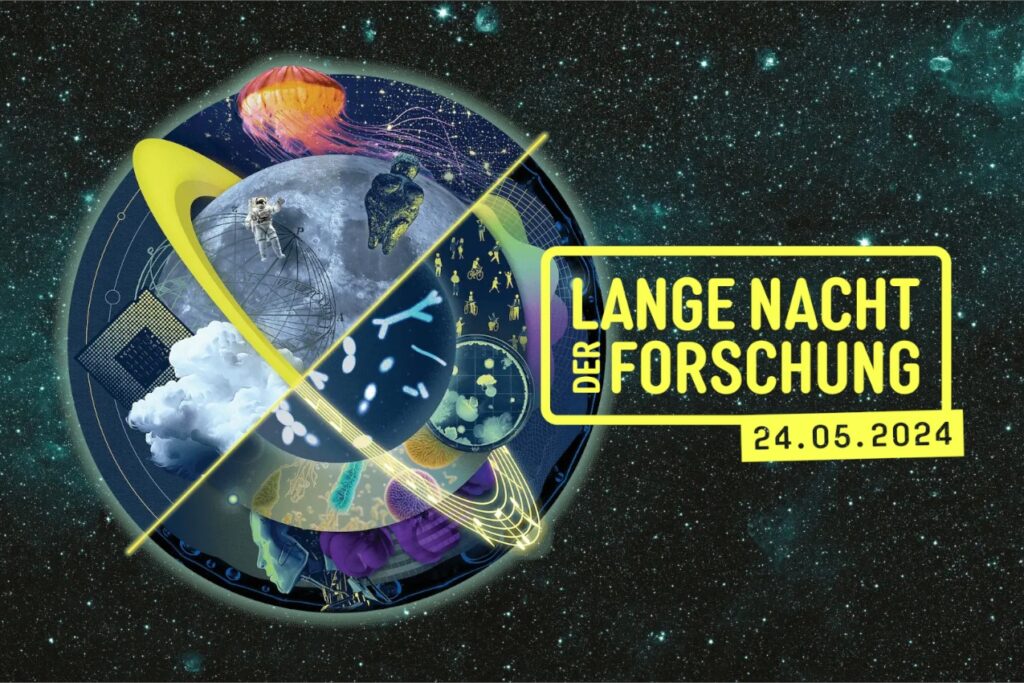
Am Freitag, den 24. Mai 2024 wird österreichweit die diesjährige Ausgabe der Langen Nacht der Forschung stattfinden, an welcher auch das BRG Steyr Michaelerplatz teilnehmen wird.
An unserem Ausstellungsstandort werden folgende Stationen zum Staunen, Entdecken und Mitmachen angeboten:
Lust auf Experimente? Gemeinsam mit unseren Besucher:innen werden wir in die faszinierende Welt der Naturwissenschaften eindringen und neben Science Shows auch die Möglichkeit bieten, spannende Experimente aus der Physik und Chemie selbst auszuprobieren.
Lust auf Wissenschaft? Diese Station gibt Interessierten Einblicke in die wissenschaftliche Arbeit am BRG Steyr Michaelerplatz, wobei ausgewählte vorwissenschaftliche Arbeiten sowie Projekte aus dem Schulalltag vorgestellt werden.
Wie kann man Lego Mindstorms Roboter bauen und programmieren? Wussten Sie, dass man aus Lego-Bausteinen nicht nur Roboter bauen, sondern diese auch programmieren kann? Bei dieser Mitmach-Station können kleine und große Besucher:innen Lego-Roboter bauen und ihnen mithilfe einer einfach verständlichen, grafik-basierten Software Leben einhauchen.
Wie wird ein Podcast produziert? Wir alle konsumieren täglich audiovisuelle Inhalte in Form von Fernsehen, Radio und Streaming. Am BRG Steyr Michaelerplatz werden neben Fotos und Videos auch Podcasts produziert, welche wir bei dieser Station vorstellen möchten. Besucher:innen haben die Chance, unseren Produzent:innen über die Schulter zu blicken und Interviews zu führen, welche wir nach dem Event in Form eines Podcasts veröffentlichen werden. Möchten Sie eine spannende Story erzählen oder Ihre Faszination über Naturwissenschaften und Technik mit uns teilen? Dann sind Sie bei dieser Station genau richtig!
Die Veranstaltung wird an unserem Schulstandort (Michaelerplatz 6, A-4400 Steyr) stattfinden und von 17:00 bis 23:00 Uhr dauern (letzter Einlass: 22:00 Uhr).
A diver inside a water bottle sinks to the ground with the help of magic powers of your fingers. What sounds to be fake, can easily be rebuilt by using some materials you may have at home, but can also be found in our school’s Physics cabinet:
a water bottle with a volume of approximately 1.5 to 2 liters (as physicists, we say 0.0015 to 0.002 m3 [one cubic meter consists of 1000 cubic decimeters and one liter has the same volume as one cubic decimeter])
a tiny plastic tube that has a hole in one transversal side
a cork that has almost the same diameter as the plastic tube
and of course: Dihydrogen monoxide (H2O), also known as water
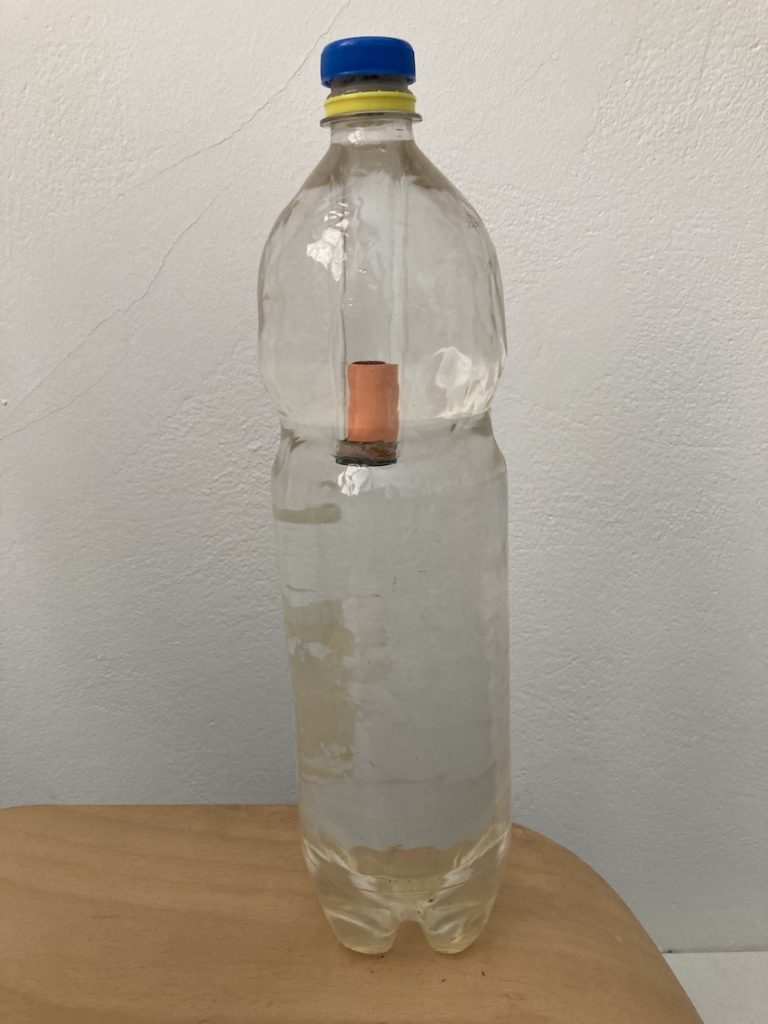
At first, you need to insert the cork into the tube and the tube into the water bottle as shown in the picture below (therefore, it is crucial that there is air above the cork inside the tube and the „diver“ is at the top of the bottle):
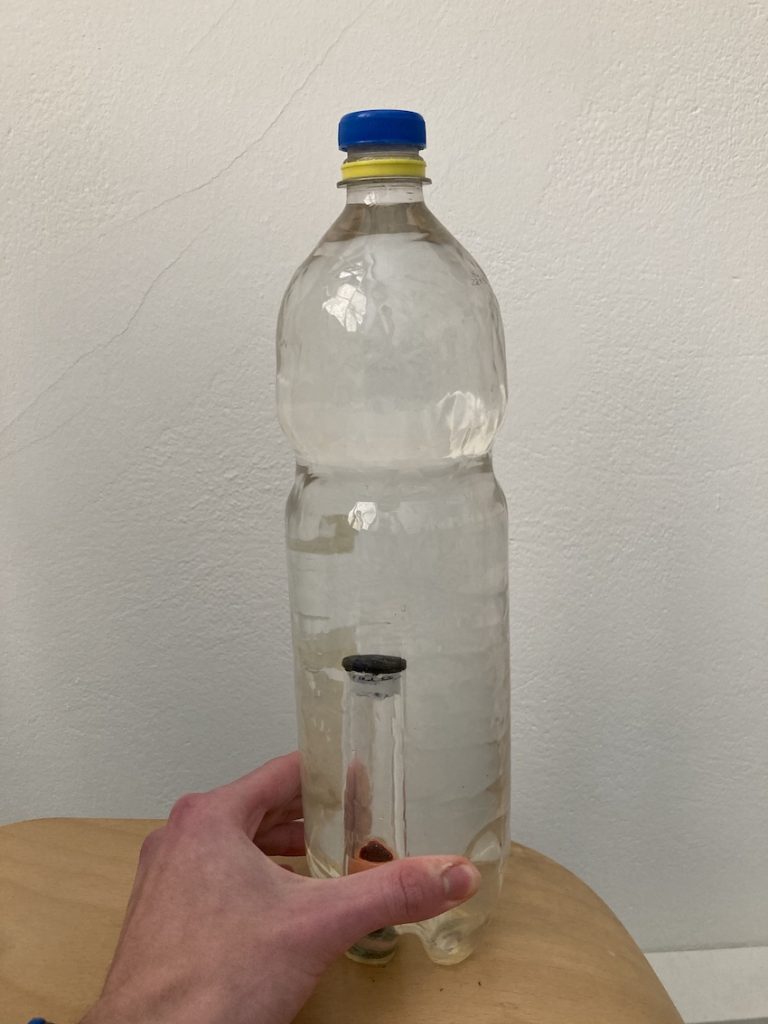
When pressing your hands onto the bottle, you might be surprised by seeing the diver gliding to the bottom of the bottle, the stronger you press the wider it glides. As soon as you stop pushing, it ascends back to the top.
But why does that occur? Do your fingers have magic powers that make a diver glide inside a water bottle? Or is Dihydrogen monoxide an unusual liquid?
As a first explanation, it can be mentioned that the water inside the bottle can be replaced by another liquid as well, that means it isn’t a special substance (at least not concerning this experiment). So don’t worry, you can go on drinking it.
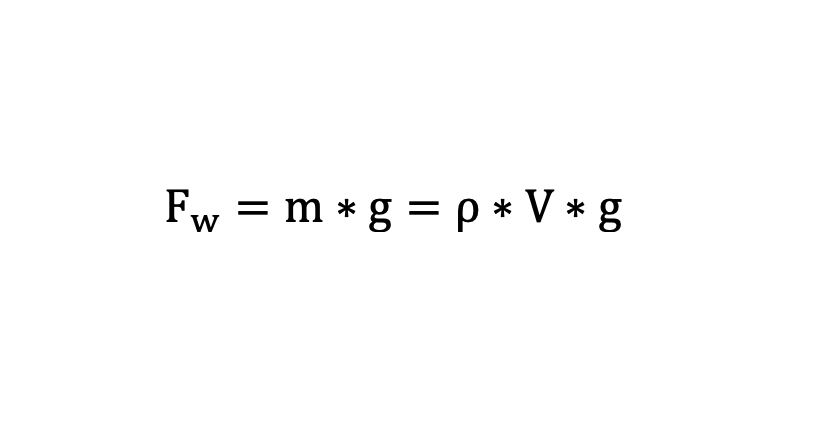
Before explaining this phenomenon, we need to take a look at a physical force called buoyancy. What the hell is that? It’s the force that makes a balloon filled with the gas Helium (chemical symbol in the periodic table of elements: He) ascend and an air-filled ball (air that surrounds us consists of nitrogen (N2), oxygen (O2), carbon dioxide (CO2) and some other low-concentrated gases) rise to the top of a water-filled swimming pool when pushing it to the ground.The buoyancy force has got the same value as the weight force of the displaced water which can be calculated easily by using the following formula:
[Fw = weight force, m = mass, g = gravitational acceleration (= 9.81 m/s2), ρ = density of water (= 1000 kg/m3), V = volume]
When investigating the formula, we can derivate that when the volume rises, there is a higher weight force and consequently also a „stronger“ buoyancy force. Invertedly, a drop in volume means a lower weight force and a „weaker“ buoyancy force.
Keeping these facts in mind, we can examine the effects in the experiment:
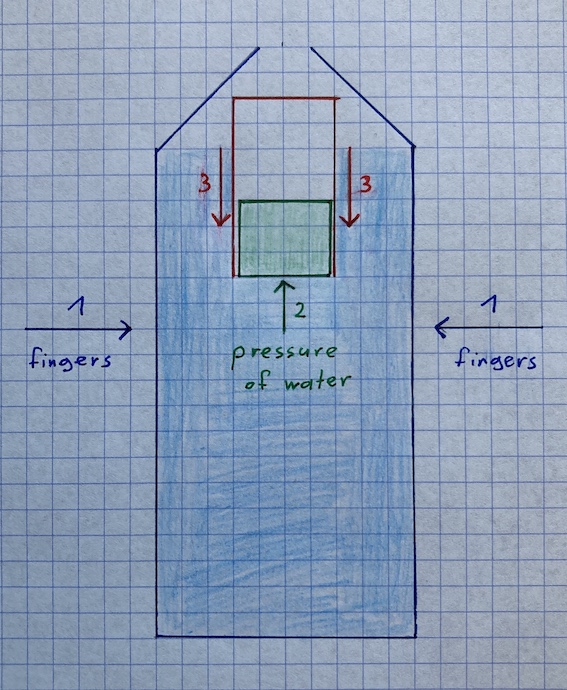
Due to the force of your fingers, the pressure inside the water bottle rises and that is why the cork is pressed into the tube. As a result, the tube’s volume decreases and as there is a direct proportionality between volume and buoyancy force, it declines as well. This can be recognized as the „diver“ (which still has got the same weight as the air in the tube is merely compressed) sinks to the bottom of the water bottle.
But don’t worry, you haven’t damaged anything: As soon as you stop pressing the bottle with your fingers, the tube ascends to the top again, so it’s reversible.
For illustration, I made a drawing to convey the theory:
Now you might ask yourself: Are there also some practical applications of buoyancy that are maybe easier than the orthography of the term?
Fortunately, there aren’t only some, but many, rather countless: As mentioned above, buoyancy is commercially used for balloon flights as it makes the balloon rise into the sky. This can be explained by outlining that Helium has a lower density than air (that means that a specific volume of Helium is lighter than the same volume of air) and that is why it can ascend and even compensate the weight of the basket that carries the people and gives them the opportunity to enjoy the weather and be amazed by the landscape.
Another application of that magic, difficultly pronounceable force are life jackets that must be provided on every boat and ship as well as in airplanes. As the material has a way lower average density than water, it can even prevent an adult from drowning when the mode of transportation has an accident.
To sum up, it can be stated that buoyancy force is hard to write and pronounce, but crucial for our everyday life. It can be used for impressing spectators by convincing them that you’ve got magic powers to make a cork diver sinking – although you just press your fingers onto a common bottle filled with usual water.
An der am Freitag, den 20. Mai 2022 stattfindenden Langen Nacht der Forschung wird heuer erstmals auch das BRG Steyr Michaelerplatz teilnehmen. Dabei wird es an unserem Standort vier Stationen zu bestaunen, aber auch zum Mitmachen geben:
Lust auf Experimente?
Lust auf Wissenschaft?
Wie kann man Lego-Mindstorms-Roboter bauen und programmieren?
Wie wird ein Podcast produziert?
Bei diesen Stationen zeigen wir interessierten Zuseher*innen spannende Experimente aus Physik und Chemie, geben aber auch Einblicke in ausgezeichnete Vorwissenschaftliche Arbeiten der Maturant*innen sowie unseren ScienceBlog. In einem weiteren Raum wird es für die Besucher*innen die Möglichkeit geben, Lego-Mindstorms-Roboter selbst zu bauen und einfache Programme mithilfe einer grafikbasierten Software zu erstellen. Zusätzlich werden wir das junge Medium Podcast präsentieren und Audio-Projekte unserer Schule zum Anhören aufbereiten.
Die Veranstaltung wird an unserem Schulstandort (Michaelerplatz 6, 4400 Steyr) stattfinden und von 17:00 bis 23:00 Uhr dauern (letzter Einlass: 22:00 Uhr). Unser Schulgebäude kann barrierefrei auch mit Kinderwägen und Rollstühlen betreten werden, es stehen Sanitäranlagen zur Verfügung.
As every year, a Chemistry Olympics course leaded by Mr. Nowitzki was held in school year 2021/2022 at our school. Every second Friday, six enthusiastic and highly curious students met up in the Chemistry room for solving theoretical tasks and doing interesting experiments to find out more about the laws of nature that determine our everyday life.
For the first time since the outbreak of the Corona Pandemic, the Upper Austrian regional competition, for many Olympionics the highlight of the year, could take place in presence after it had to be carried out as an online competition in 2020 and 2021, especially the practical tasks were attracting after a long period of studying at home.
This year, it was considered to take place in Braunau from Tuesday, April 26th till Thursday, April 28th, 2022. That is why our school’s participants Florian Nowitzki (7a), Elias Leitinger (7b), Jonas Untersperger (7a) and Michael Himmelbauer (7a) took the train to Braunau Tuesday morning. After the arrival, they were picked up by a bus and were brought to their accommodation, the local boarding school. The same afternoon, they had the opportunity to listen to a highly interesting interactive presentation of the spokesman of AMAG, a local Aluminum factory, about the worldwide enterprise’s values and strategies to succeed. Subsequently, a guided tour that gave insights into the different steps of production to some of the buildings was offered to the group of 44 students.
The next morning after having breakfast, they were brought to the high school building where the competition was held. Within a working time of three hours, 20 pages of theoretical tasks had to be solved with the help of formula sheets, a calculator and of course the periodic table of elements. In it, the reaction equation of a coin made of Copper with nitric acid had to be examined as well as organic tasks about the structure of different molecules consisting of carbon, hydrogen and oxygen.
The second part, the practical experiments, was carried out in the afternoon, the ingredients of seven different liquids had to be worked out and the concentration of Zinc and Magnesium ions had to be calculated by investigating different reactions that cause a change of the liquid’s color inside the beaker when a given substance drops into the unknown one. In the evening, our school’s contestants enjoyed playing cards and discussing about the challenging, but fascinating exercises that required focusing and recalling all scientifical knowledge taught in the preparation courses throughout the entire school year.
On Thursday, a festive awarding ceremony including musical performances and speeches of political and economic representatives was held in Braunau’s event location. At the end of it, all participants got their well-deserved certificates as well as presents like a cup, pens, books and t-shirts. Florian Nowitzki (7a) won the seventh price, Elias Leitinger (7b) placed eighth, Jonas Untersperger (7a) became 13th, Michael Himmelbauer (7a) achieved the 14thplace.
Despite the ongoing Corona virus pandemic, a Physics Olympics course leaded by Mr. Haberbauer could take place in school year 2021/2022 in our school.
After a few days of searching for new, young and enthusiastic participants, we could finally start at the beginning of October 2021 with eleven curious scientists to meet up every second Friday afternoon from a quarter to two to half past four in the Physics room. During the voluntary homeschooling in December, the students were connected via Microsoft Teams video meetings in order to collaborate in remote as effectively as possible.
On the one hand, the participants dealt with several more or less difficult exercises out of the different physical disciplines. In addition to the theory, they conducted and did experiments, but also had a look at the processes behind that explain different usual and unusual phenomena according to our slogan „Everything happens for a reason, and that reason is usually Physics.“.
In order not to overtax our new and rather unexperienced physicists from fifth grade, a wide range of tasks with different levels of difficulties were offered to choose between. While the younger participants tried to solve former course competitions, their elder colleagues had a look at the regional and countrywide contests.
As every year, the Physics Olympics course competition on Friday before the half-term holidays (February 18th, 2022) was the conclusion of an amazing and highly interesting course. In it, the competitors had to solve tasks out of the categories Mechanics, Electricity and Optics, some even had the opportunity to find out the spring constant of a rubber ring by measuring the weight of the metal cylinders and the diameter of the expanded rubber ring. After Mr. Haberbauer had evaluated the exams, he could happily announce that Michael Himmelbauer (7a, first place), Jonas Untersperger (7a, second place) and Elias Leitinger (7b, third place) had qualified for the regional competition of Upper Austria. The other candidates Sarah Diregger (6a), Florian Nowitzki (7a), Oliver Kovacs (7b), Evelyn Herrmann (5b) and Moritz Kolb (5b) could achieve respectable results as well.
After the well-deserved half-term holidays with more or less private preparation at home, the three students (mentioned above) took part in the Upper Austrian Physics Olympics regional competition on Tuesday, March 1st, 2022. Due to the Corona pandemic, it had to take place in the course schools again (as the year before) as a replacement for the traditional event in Linz. The tasks and materials for the experiment were sent to the schools in advance. Within a worktime of four hours, the candidates had to solve challenging exercises out of the disciplines Mechanics (opening a door with the help of a rope), Electricity (generating voltage by using solar panels) and Optics (lenses, bar grid), the experiment was out of the category Electricity. By charging and discharging, the capacity of a capacitor had to be calculated. Furthermore, a voltage was produced in a rather tiny solar panel with the help of a little LED, its effects on the flow had to be investigated.
After a stressful afternoon of correcting the calculations and submitting the results to the regional coordinator in Linz, we happily received a message that Michael Himmelbauer (7a) won a first prize, that is why he qualified for the countrywide competition 1 on March 14th, 2022, Elias Leitinger (7b) reached a third prize, Jonas Untersperger (7a) could achieve a respectable ranking as well.
In representation for all participants, I would like to thank Mr. Haberbauer for his patience and efforts throughout an exhausting, but also fascinating year of Physics Olympics!
First of all: A warm welcome to the recently introduced category „ScienceNews“!
Due to the wide range of scientific news provided by different more or less serious webpages where several authors with a different level of knowledge and experience can publish stories they consider to be worth reading them, we decided to set up a new platform as a subpage of the ScienceBlog that we called „ScienceNews“.
On that platform, we would like to release articles that explain current scientific events (for instance the start of a new innovative rocket to discover the planet Mars or a breakthrough in reusing emitted warmth to slow down the climate change) in a way that not only experts, but also „common“ people that do not have any special pre-knowledge are able to understand and follow the most significant points. For illustration, we will attach some photos and graphics that deepen the understanding of the processes in the background (which are often even more interesting than the event itself) that enable the readers to get curious and make them wanting to find out more. Therefore, we will give credit to the sources and add some links referring to additional information at the ending of each post.
As we have got a few motivated and enthusiastic writers, our articles will be provided either in English or in German.
In case you have got ideas or improvements, we are happy to receive a message in order to fulfill our aspiration of getting better every day according to our slogan „You are always a student, never a master. You have to keep moving forward.“ (Conrad Hall, photographer and filmmaker).
We hope you appreciate our well-researched articles as much as we do. Enjoy reading them!
written by Michael Himmelbauer (in representation for the whole ScienceBlog team)
By using a common shoebox, enjoyable music with a high sound quality can be played. What sounds to be unimaginable, can be realized with some components you may have at home, but can also be found in the physics room:
an amplifier (the older the better)
two cables
a magnet (the stronger the better)
a coil (or a long piece of wire and a cylinder (for example from toilet paper))
the star of the experiment: a shoebox (without the cover)
a device with a plug to play music
and of course: enjoyable music (for instance on your mobile phone)
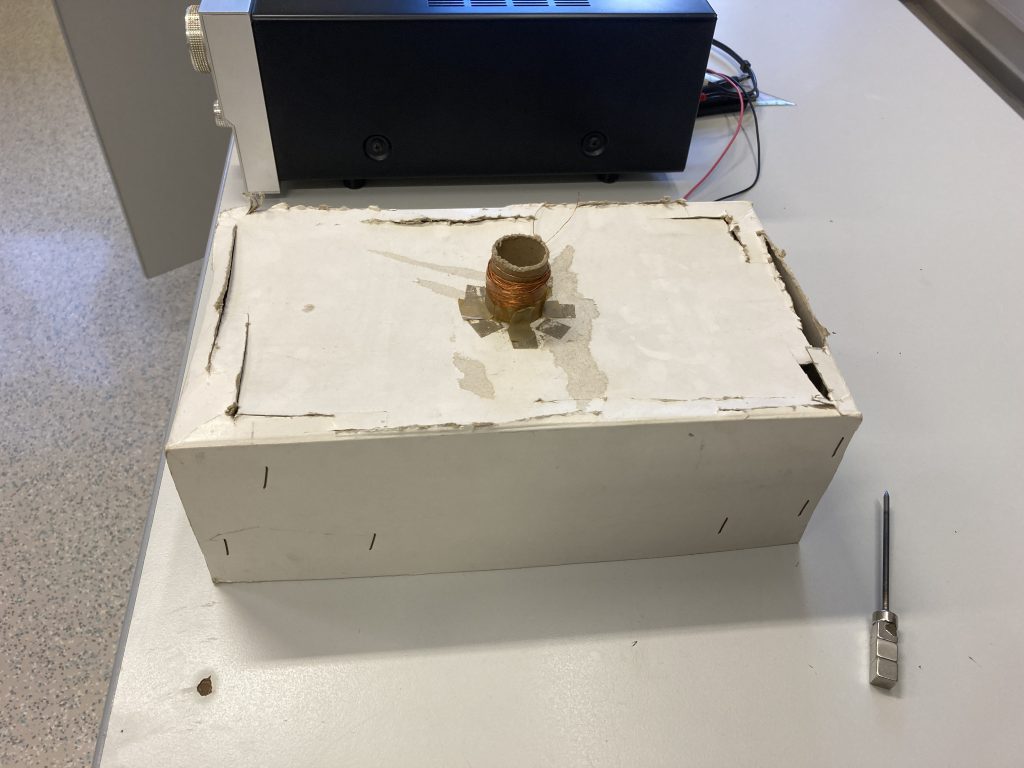
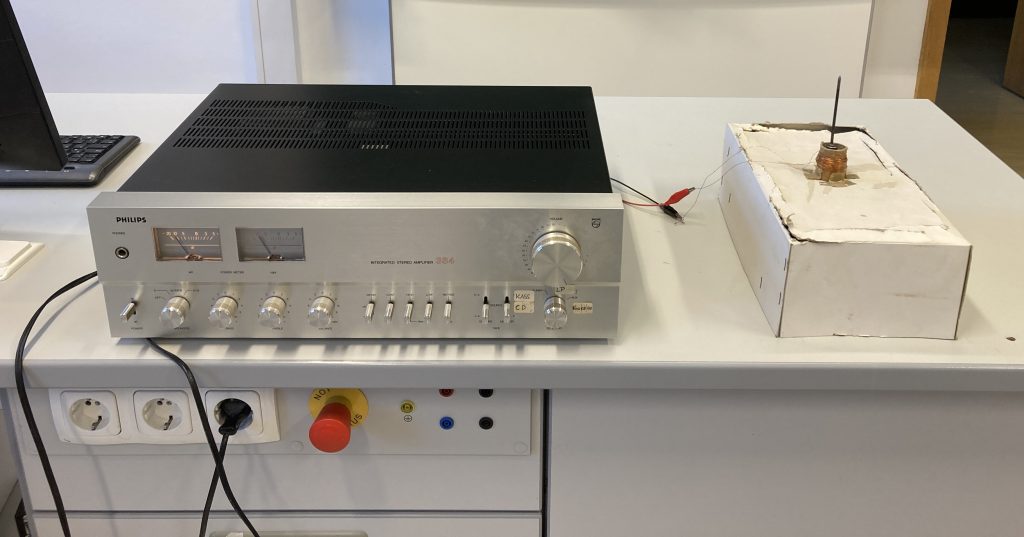
First of all, you have to glue the coil (or the wire wrapped around the cylinder) onto the bottom of the shoebox. Furthermore, the cables have to be plugged into the amplifier (take care that you use the correct ports) and have to be connected to both of the ends of the coil (no matter whether it is bought or a self-made one) as shown in the pictures:
Moreover, you have to select a relaxing song to play (due to the wide range provided on the internet, this could be the most difficult part of the experiment). In order to broadcast the music, you have to connect your mobile phone, computer or MP3-player to the amplifier (either via another cable or wireless). As soon as you have started the song, place the magnet in the middle of the coil as shown in the picture:
In case you read the instructions carefully and the cable connection works, you may be speechless at that point as you can hear your favorite song without using a classical speaker (or headphones).
But why’s that? Why can music be played without using speakers?
Admittedly, the shoebox works as a speaker as the mantle of the cuboid replaces the membrane.
In order to understand that phenomenon, we need to take a look at an electro-magnetic force named by the physicist Hendrik Antoon Lorentz. It occurs as soon as a current flows through a conductor. Its direction has an angle of 90 degrees to the direction of the flow and the magnetic field.
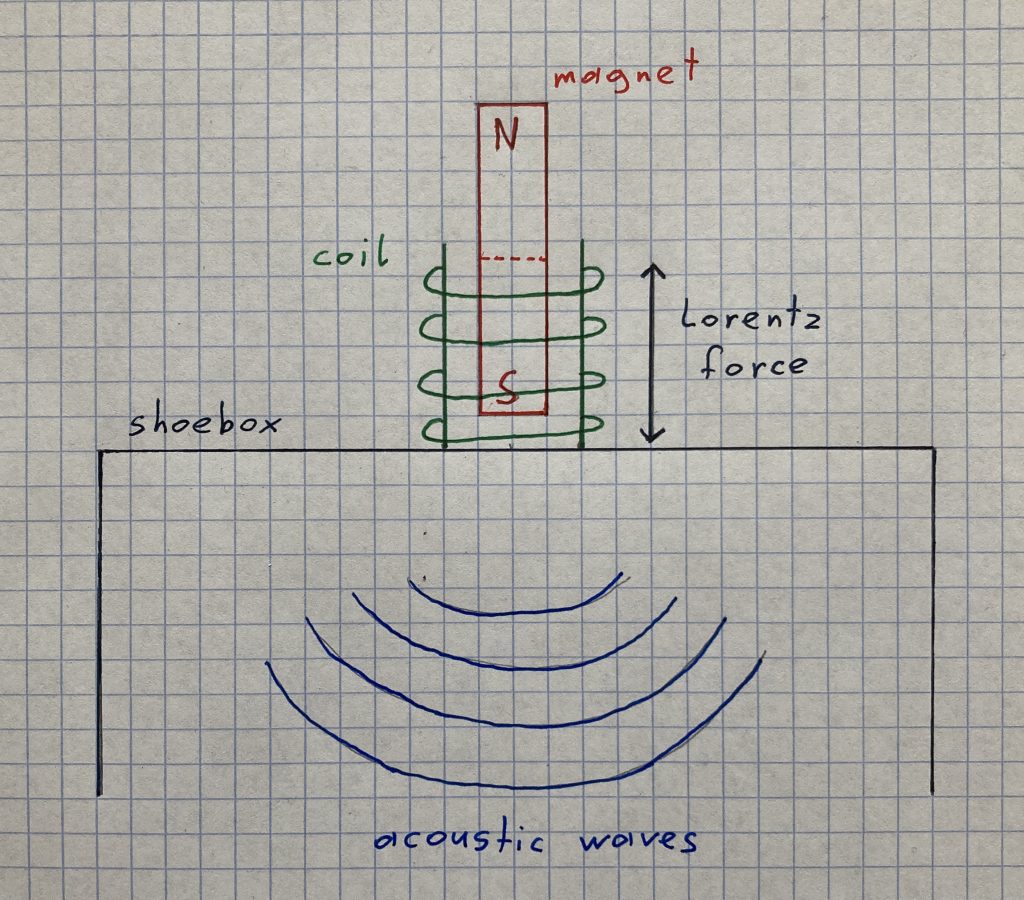
And as the amplifier dispenses alternating current (AC), the direction of the flow inside the coil changes constantly and that is why the direction of the Lorentz force changes, too. Subsequently, as the magnet remains at the same place, the coil swings back and forth with the frequency of the flow (that the amplifier dispenses). As a result of that (the coil is sticked onto the bottom of the shoebox), the membrane swings with the same frequency. Moreover, the swinging membrane spreads waves into the air that get to our ears where they are converted into an electric signal that is forwarded to the brain (ask a biologist if you’ve got any questions concerning the processes inside the human body).
To convey the theory more easily, I made a drawing that outlines the effects of the currency to the coil and depicts the formation of the acoustic waves:
In case you are curious, you could also use the speaker for playing spoken records (for instance a speech from a well-known politician or the latest news program). While listening to the wisely chosen words from a famous person, you may be amazed by the high quality and the clear sound.
Another usage of the self-built speaker could be its opposite, a microphone. When recording waves, the Lorentz force is considered to move the electrons inside the wire and that is the reason why an electric voltage is induced (to try that, you could conduct an experiment on your own that is similar to the described one).
To sum up, it can be mentioned that with the help of a shoebox and some other components, but without a speaker, music can be played and quite some things can be found out about the characteristics of the acoustic waves that enable us to understand each other properly.
source: Putz, Bruno; Jahn, Brigitte: Faszination Physik 7 bis 8. Lehrplan 2018. Linz: Veritas 2019, p. 13
A usual laser pointer emits one ray, but nine can be seen on the wall after the ray passes a special optical instrument. What sounds to be impossible, can be realized with the help of some components that you may not have at home, but fortunately can be found in the physics room:
a laser pointer (for example a green one)
a bar grid
two tripods
for measuring: a measuring tape
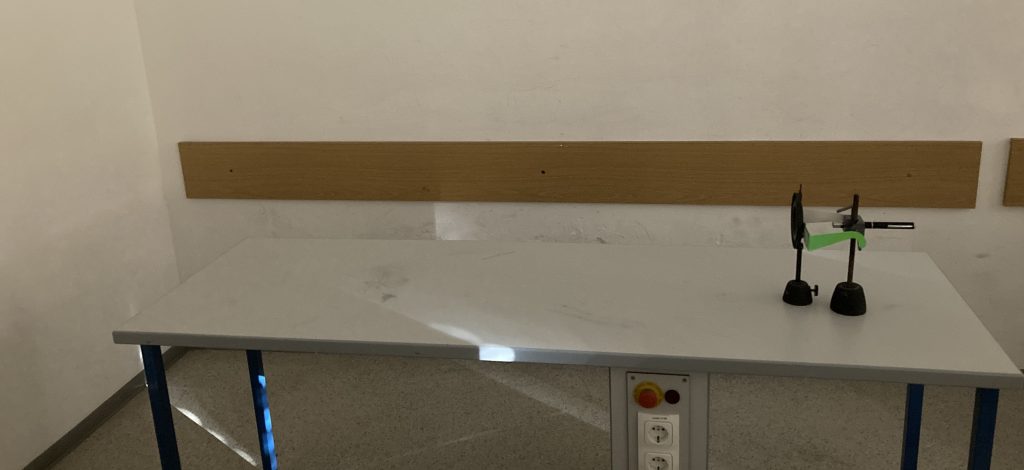
First of all, you have to set up the components as shown in the picture, preferably in front of a white wall in a rather dark room.
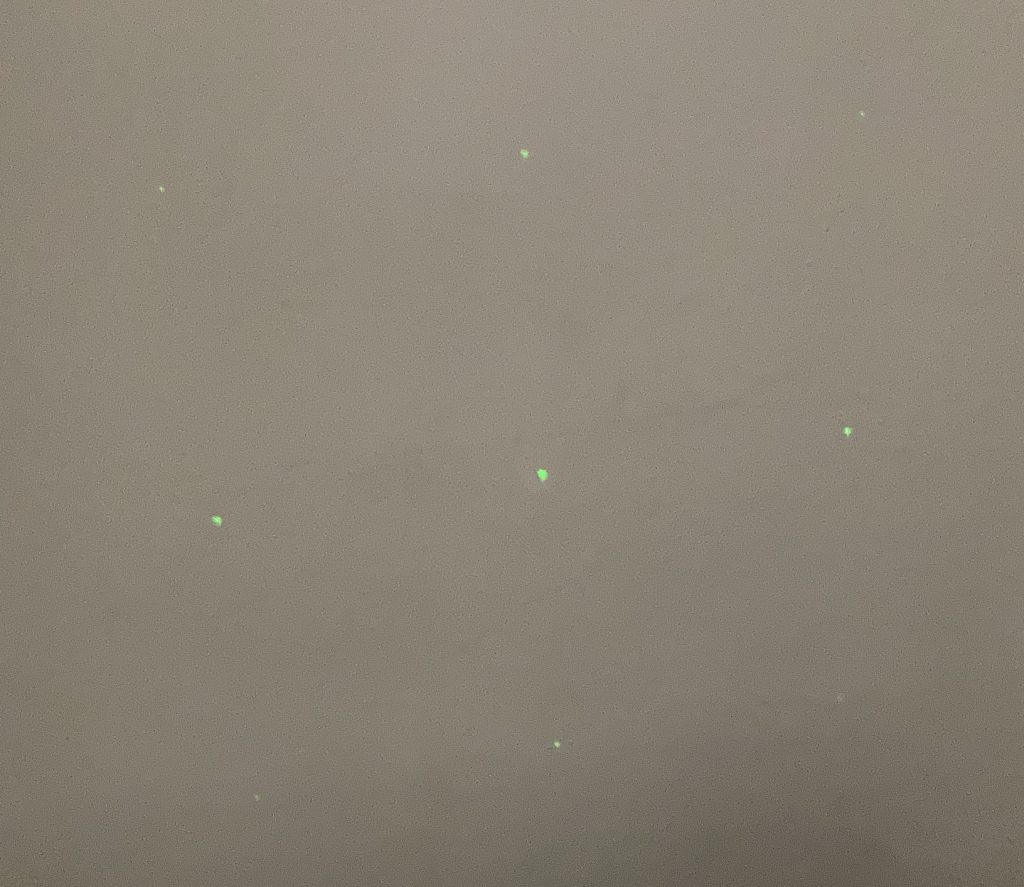
When you switch on the laser pointer, you may be surprised by the fact that you can see nine rays on the wall, although only one ray is emitted by the laser pointer. At that point, you might want to ensure that it works properly, but please do NOT look directly into the light of the laser pointer for safety reasons (at least if you don’t want to damage your eyes forever).
Now you may ask yourself: Why’s that? Why can nine times as many rays be made out even if only one is emitted?
Therefore, we need to take a look at the structure of the bar grid. It consists of several lines into horizontal and vertical direction printed onto a disc of glass. The label „200 lines per millimeter“ means that there is a space of 0.000005 m between each of the lines.
For simplifying the process, we need to assume that the bar grid doesn’t feature several, but only two gaps (with the same width as above). When an electromagnetic wave passes these gaps, it turns from a straight to a circular wave. After that, the amplitudes of the waves interfere with each other, and those interferences are spread until they get to the wall. There, they are reflected and the light (again in the form of waves, but with a much lower density) gets to our eyes.
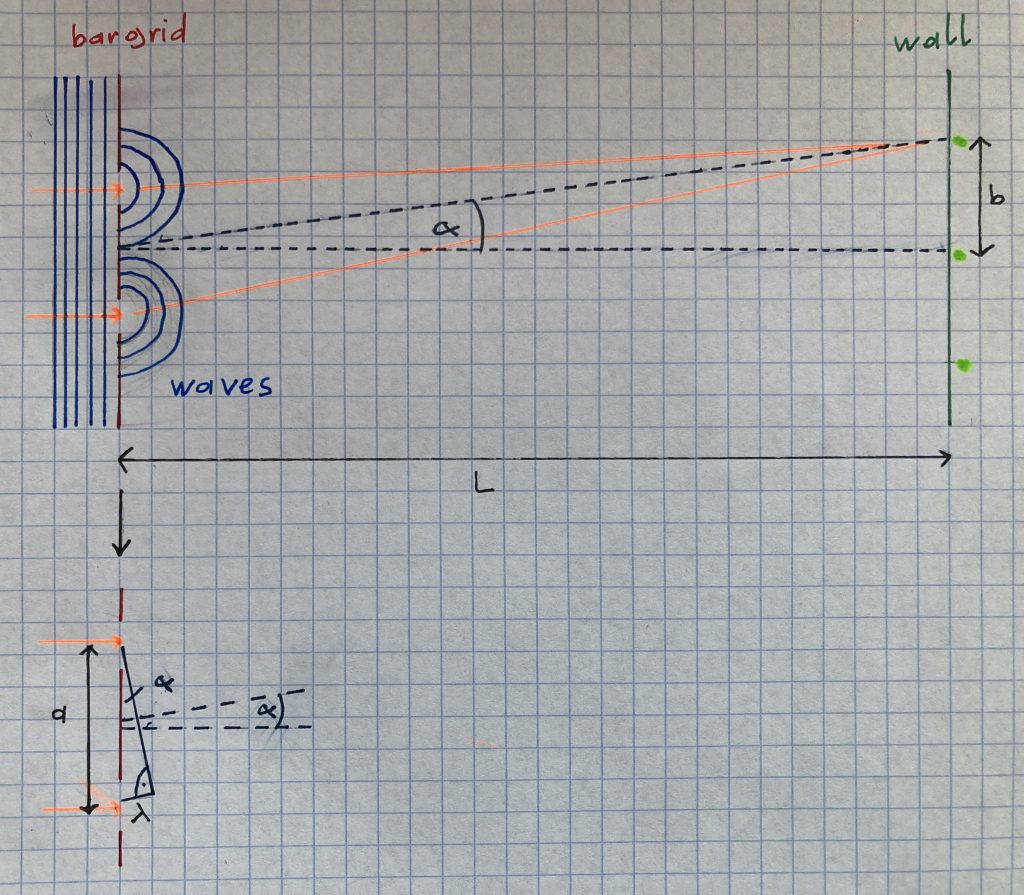
For illustration, I made a drawing to convey the theory:
The next question that comes to your mind might be: Can this theory also have benefits when using it in a practical way?
As a scientist, I say: Yes, it can. For instance, we can take usage of it when calculating the wavelength of a specific color (and that’s the reason why we conducted this experiment).
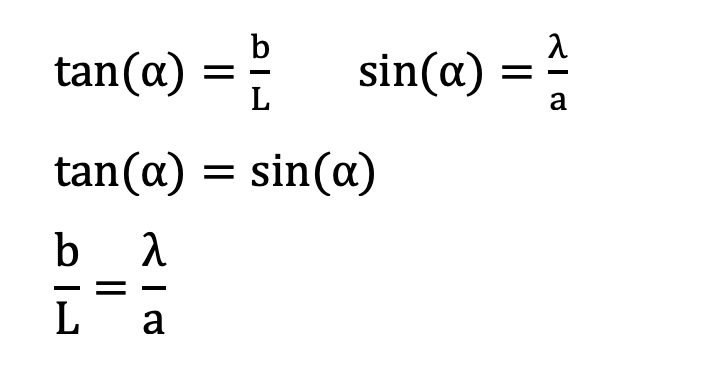
For simplification, we have to estimate that the sine of a small angle is has almost the same value as the tangent of the same angle (supported by the fact that for angles like that, the cosine is almost 1 and the tangent is calculated by the quotient of sine and cosine).
According to the drawing above, we can make up the following equations:
And as we are able to measure the distance from the tripod to the wall (2.08 m), the distance of the lines on the bar grid (0.000005 m) and the space between two points on the wall (0.225 m), we are able to do the following calculations easily:
That means that the light of the green laser pointer we used in the experiment has a wavelength of approximately 541 nanometers.
Another practical application of the effects of interference is used in clubs for the disco lights, featured with a small engine that slowly rotates the light emitting diode (LED). That is why some impressing patterns can be seen on the walls and on the ceiling.
To sum up, it can be mentioned that with the help of a laser pointer, a bar grid and two tripods, the wavelength of a specific color can be calculated and quite some things can be found out about the spreading of the electromagnetic waves that light up our everyday life.
source: Putz, Bruno; Jahn, Brigitte: Faszination Physik 7 bis 8. Lehrplan 2018. Linz: Veritas-Verlag 2019, p. 68-69
Firstly, you put a few grams of two white powders into a beaker and after stirring for a minute, it turns into a turbid liquid. What sounds to be impossible (or fake news, as we would call it), can be realized with the help of some components you may not have at home, but luckily can be found in the chemistry room:
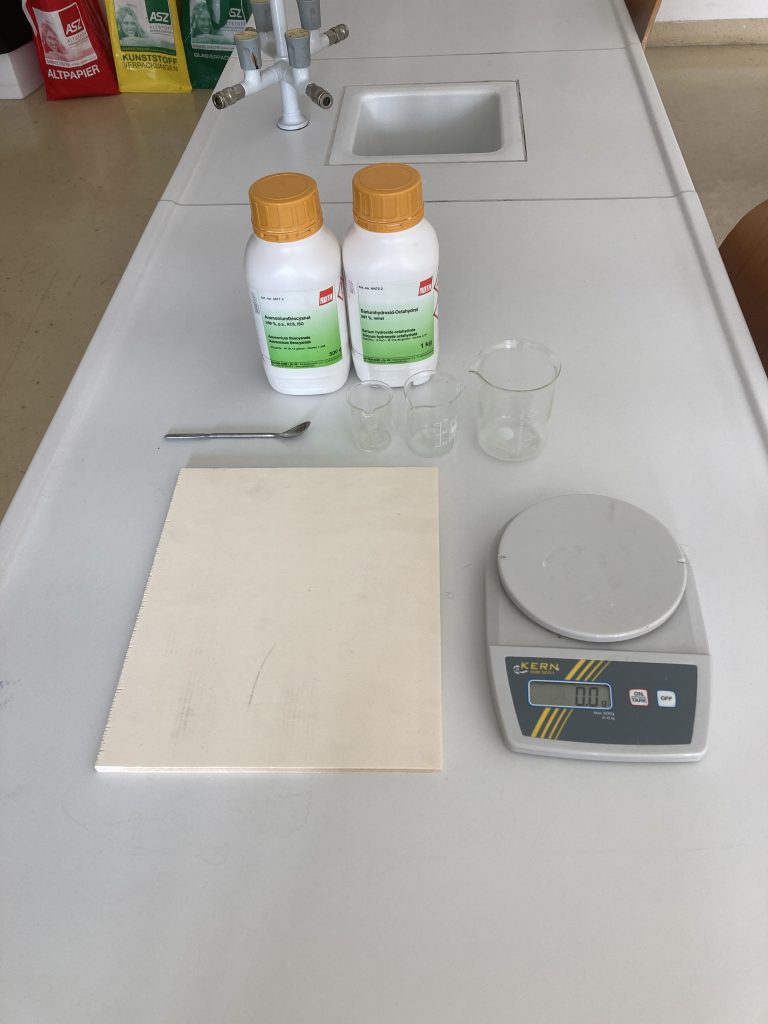
two beakers
a spoon
a scale
a brick of wood
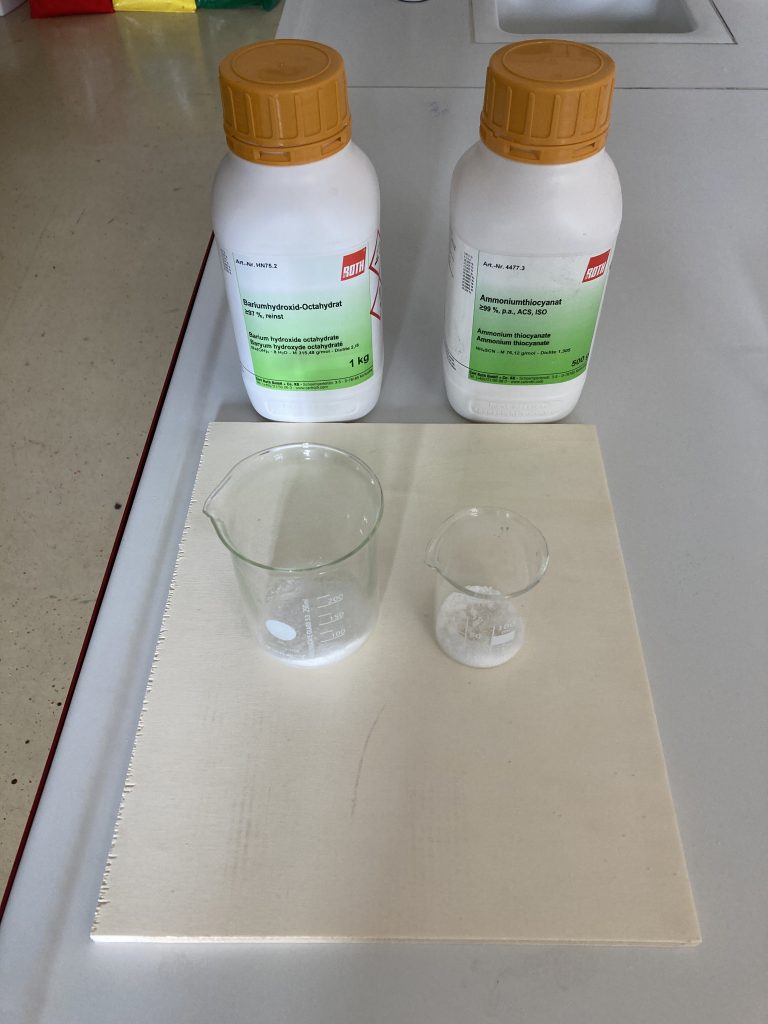
the stars of the experiment: 15 grams of Barium hydroxide (Ba(OH)2) and 5 grams of Ammonium thiocyanate (NH4SCN)
some water (H2O)
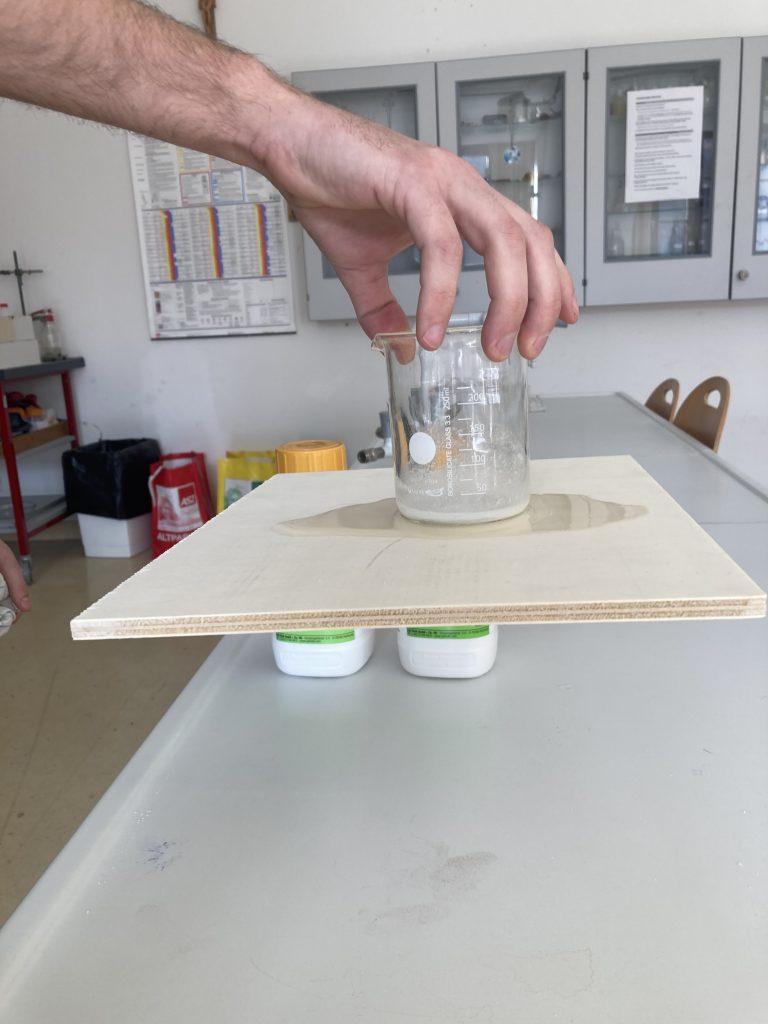
First of all, we weigh the required amount of the two powders with the help of the scale and put them into the two beakers as shown in the picture:
Next, we do something you better should not do if you don’t know what’s inside the beakers (fortunately, I know what I’m writing about): We pool the two powders into one beaker (in case you’ve got two different sizes: put it into the bigger one) and mix them with the help of the spoon. After some time stirring (and maybe a hurting arm), we recognize that inside the beaker, the powders disappeared and were replaced by a turbid white liquid. Furthermore, the fluid smells strange. In case you touch the bottom of the glass, you may find out that it feels cold (although the windows and the fridge are closed, so the cause of the low temperature is the beaker – even if you don’t believe it).
But why’s that? How can two powders that look almost similar turn into a liquid that stinks and cools down its environment?
To explain that chemical process, we have to take a look at the reaction equation of Barium hydroxide with Ammonium thiocyanate:
According to the equation, the educts Barium hydroxide (that consists of Ba(OH)2 and solid water (H2O)) and Ammonium thiocyanate (NH4SCN) react with each other. The products on the right side of the equation are Barium thiocyanate (Ba(SCN)2), Ammoniac (NH3) and liquid water (H2O). The turbid liquid consists of Barium thiocyanate and water, Ammoniac is released into the air as a gas that causes the unpleasant smell.
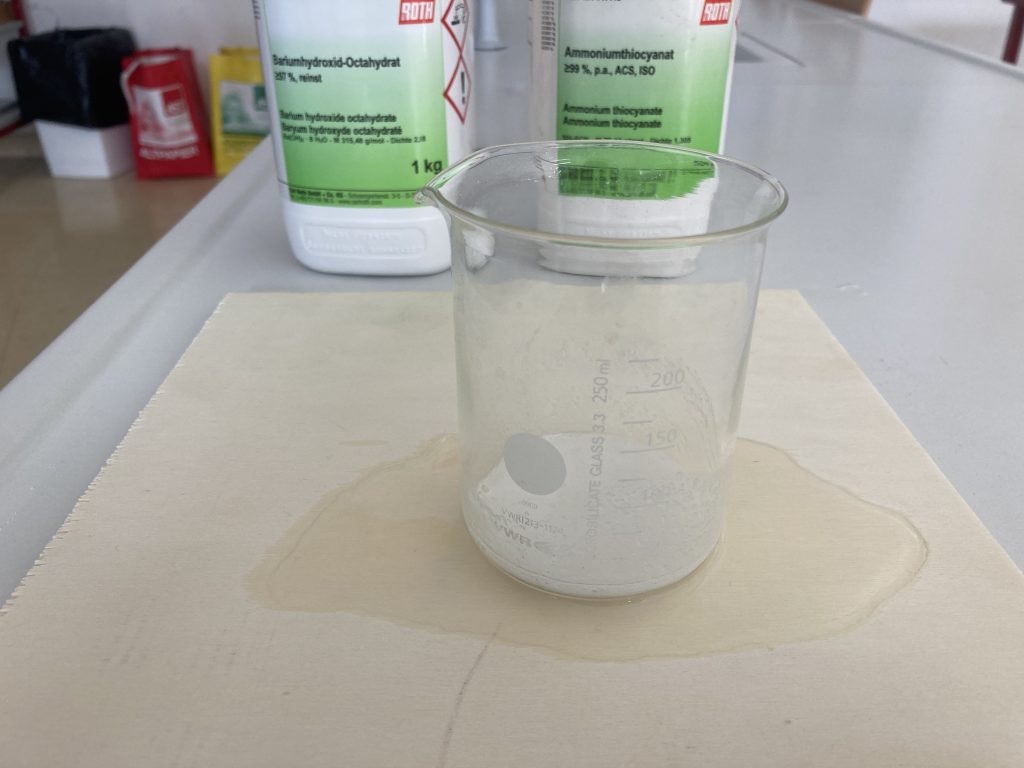
And in case you put the beaker onto the wept brick of wood, you might be frightened when you want to lift the glass because you may recognize that the ice-cold beaker sticks onto the brick of wood:
But why can a liquid that consists of two strange powders make a glass stick on a wooden part?
In order to answer this question, we have to know that the chemical reaction described above is considered to be an endotherm reaction as energy (in the form of warmth) is required all the time. This energy is taken from the environment around the powder in the glass, and that is why the glass cools down. And as we all know (or have at least learnt at school), water freezes in case the temperature drops below zero degrees. Caused by the fact that we put some water onto the brick of wood before mixing the powders, the breaker has frozen onto it.
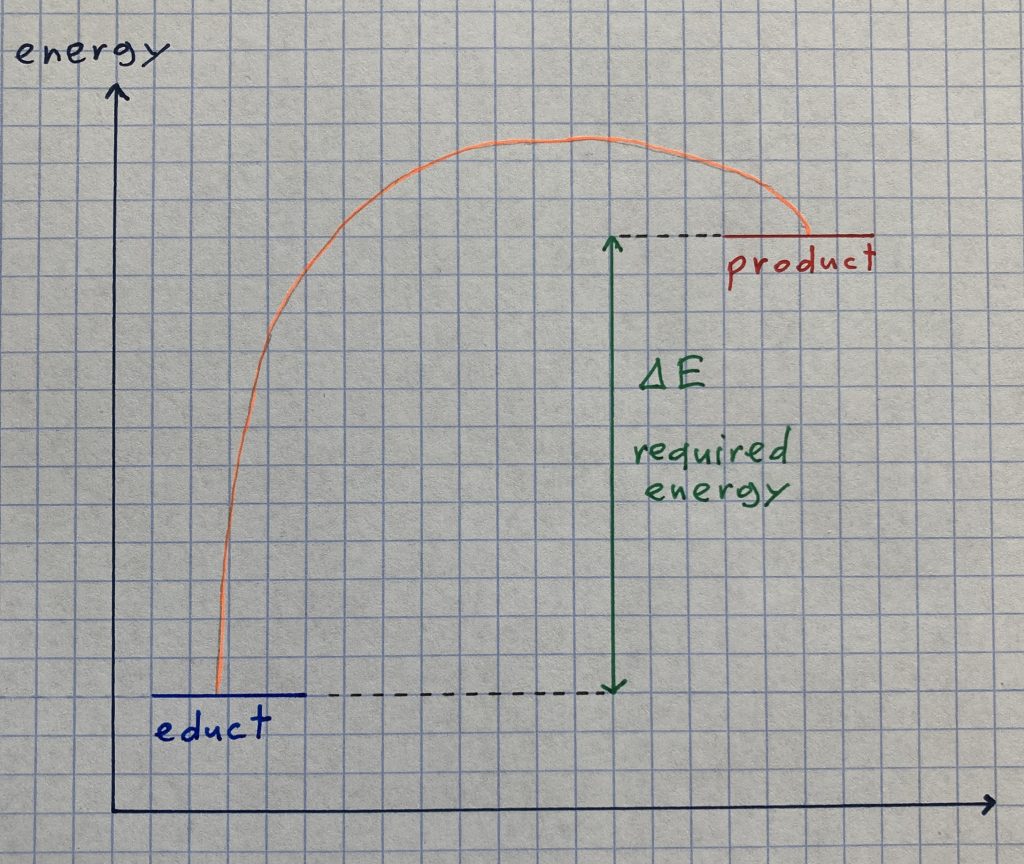
The energy graph (a diagram that shows the amount of energy a substance contains) of an endotherm chemical reaction outlines that the products in the end have a higher level of energy than the educts at the beginning. In order to compensate the difference, energy in the form of heat is required and is taken from the environment.
To sum up, it can be stated that when pooling two special powders into one beaker, their state of aggregation turns into liquid and the required energy can make the glass freeze onto a brick of wood. Both are results that wouldn’t come to your mind when you’re thinking about powders, would they?
I am quite sure you have already seen it or at least heard about it: the magic tube. An optical experiment which is usually shown at the presentation evening of our school. An experiment with the help of which you can impress students from primary school as well as grown-ups (believe me – I am talking out of my personal experience). Although the name sounds complex, it can easily be done at home.
Here is what you need:
a transparent plastic tube with a length of approximately thirty centimeters
two polarization-filters (honestly, these could be the components the most difficult to get)
a screwdriver
a ping-pong ball (or something similar)
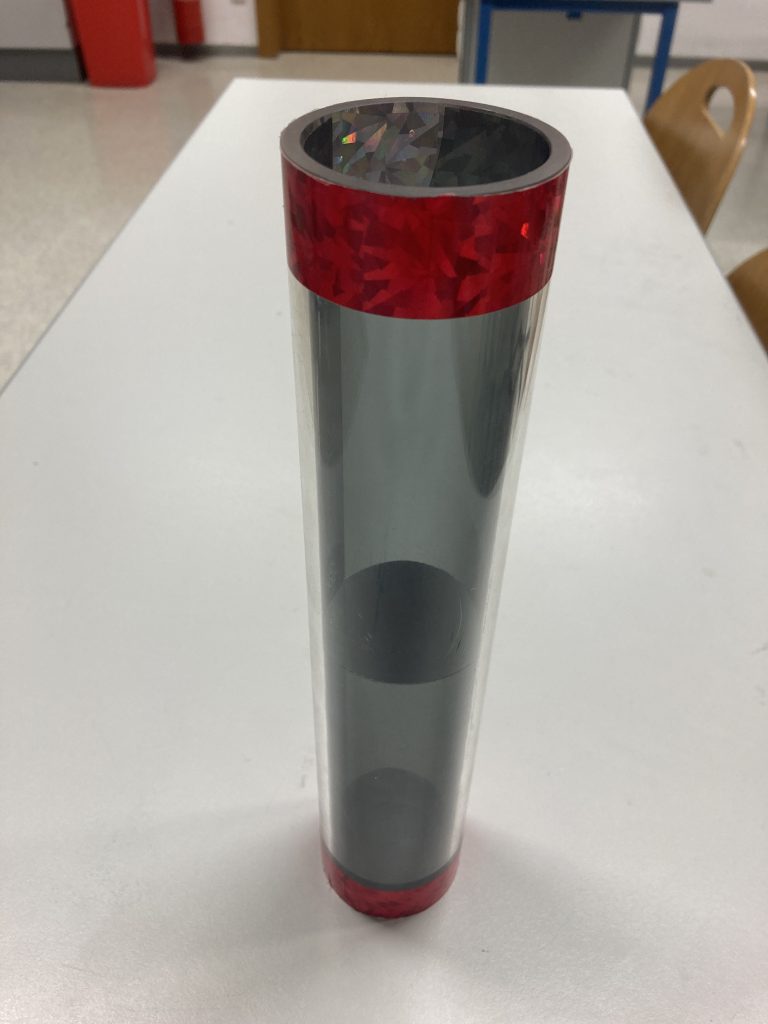
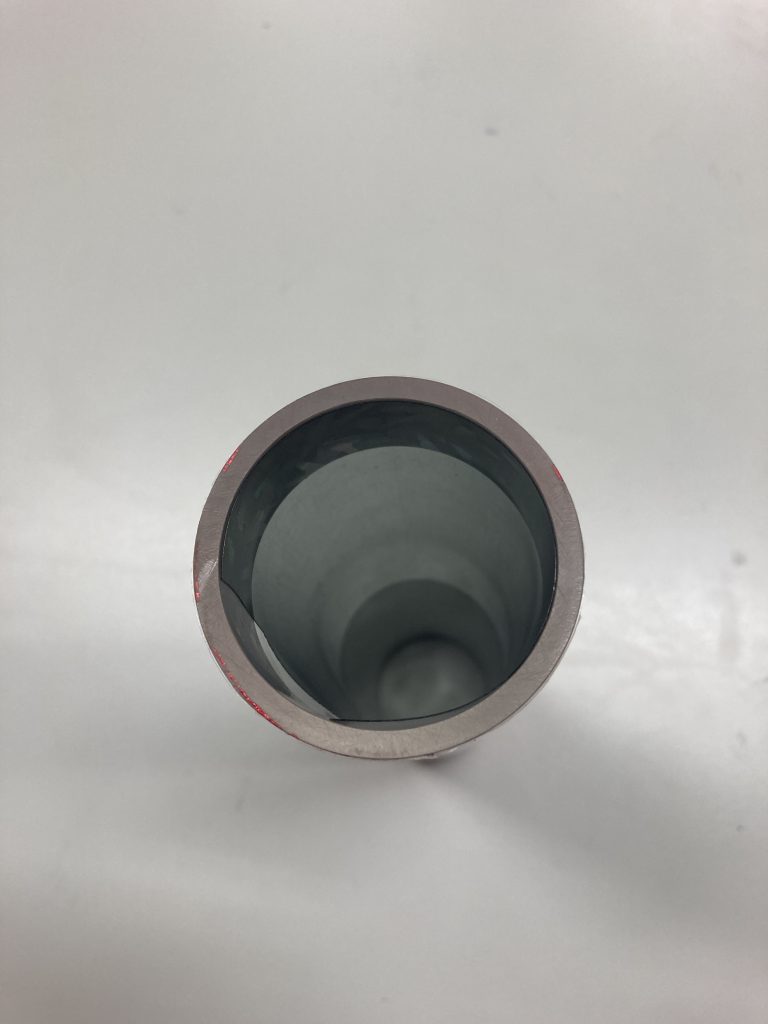
At first, you have to put the two polarization filters into the tube rotated by an angle of 90 degrees as shown in the picture:
As you may expect, a round black disc can be made out in the middle of the tube. In order to check whether it is real or not, you could use the screwdriver or the ping-pong ball to try if you are able to penetrate the disc (especially young children can be impressed by that). After some tries you might find out that the magic black circle does not really exist or is at least not resistant against your power (caused by their knowledge and perspective, younger students are often confused at that point).
But why can a black disc be seen even if there isn’t anything inside the tube except two plastic films?
First of all, we have to get in touch with the physical discipline of optics. (Now you might ask yourself: What the hell is that?) It is the science of the spreading of light and the effects of different materials on its behavior. Normally, light is a wave spreading from its origin (for example the sun, but also the lightbulb inside the physics room) into all directions. As soon as it gets to the polarization filter, only the horizontal or vertical component of the wave is let through and the other parts are kind of absorbed by the film (at least, it is easy to imagine this physical process like that). To simplify the process, we imagine that light does not exist out of vectors into every direction, but only into the following two directions: horizontal and vertical. As you put the two filters rotated by an angle of 90 degrees into the tube (in case you read the instructions carefully), both one of them only let 50 percent of the entered light pass through. And in case you are able to square 0.5 (I suppose you can or know how to use a calculator), you’ll find out that only 25 percent (so almost nothing) of the original amount of light will pass both films. And that is why a magic black disc can be made out inside the tube. In case you are talented in imagining geometry (or attend geometry class), you might assume that when you look through both filters when being amazed by the effect inside the transparent glass, the waves getting to your eyes (ask a biologist if you have any questions concerning that topic) have to pass both polarization filters and that is why there seems to be an almost black object. The color of the disc can be explained by the fact that if 75 percent of the light is absorbed, the rest (25 percent) appears to be quite dark.
Just in case you are really fascinated by the effects of two toned plastic films, you can try watching reflections of the window on a smooth surface (for instance the floor in the physics room) by looking through one of the polarization filters. While rotating the filter slowly, you might find out that you can see the reflections when holding it in one direction, but in the other direction, they disappear. It’s magic, isn’t it?
To sum up, it can be stated that with the help of two polarization filters, many spectators can be impressed and quite some things can be found out about the characteristics of the magic waves that light up our everyday life.
source: Anon.: Polarisation von Licht. Einführung. https://www.leifiphysik.de/optik/polarisation/grundwissen/polarisation-von-licht-einfuehrung [last access: 22.01.2022]